Supplies: Red and Green Felt, Fiberfill, Scissors, Sewing Machine, Red and Green thread for some hand stitching.
Using this pattern, cut the radish out using red felt for the body and green felt for the leaves.
Arrange the first 2 sections of the body, tucking the leaves in the middle. The leaves should be arranged with the thinner piece in the middle and the wider 2 pieces on the outside. Take care in arranging the leaves so that you are only sewing the bottom of the leaves into the body of the radish.
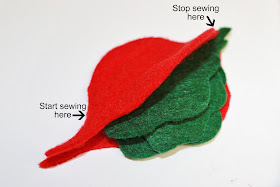
As indicated above, you will want to start sewing just above the bottom or root of the radish and end sewing at the very top of the radish. It should look like this.
Continue sewing the body of the radish together until you have finished sewing all 4 of the sides together. Make sure to adjust the leaves, with each side that you sew, so only the bottom stems of the leaves are sewn into the radish.
For each side, continue to start sewing from just above the root.
And end sewing at the top of the radish.
Turn your radish right side out by gently pulling your leaves through the un-sewn root bottom.
It's starting to look like a radish, a deflated radish but a radish nonetheless.
Begin to stuff your radish with fiberfill.
With needle and red thread, begin to sew the root of your radish closed.
After one side has been sewn, this is what it will start to look like.
Tuck one of the roots into the body of the radish. Leaving the 2 roots you just sewed together and one additional root.
Finish sewing the other 2 sides together. By tucking in a root section, leaving only 3 of the root sections out, your root will twist and begin to look more organic and interesting.
Your radish could be considered done BUT I like to add just one more step by giving a little structure to my sad wilted leaves.
See the difference?
Pinch and twist your leaves together.
Using green thread (and needle), about a 1/4 of an inch up from where your stem connects to the radish, start to stitch the leaves together tightly.
Adding one additional step and a couple more minutes of time, your radish now looks ripe for the picking.
Ready for my I heart fake food pun conclusion. Prepare yourself, it's pretty bad. Aren't these rad-ish? I know, terrible. How about you can't beet how cute these radishes are?
If you enjoyed this felt radish tutorial, make sure you continue to follow my 'I heart fake food' tutorials.


You really are talented. I can't believe how realistic your food looks. Please feel free to link up as many as you like at my Felt Food Roundup. I would love to have a huge list of ideas, and I know that every link you add sends you more traffic.
ReplyDeleteYour stuff is so amazing!!! (Did I say that already?) I'm following you via email.
It’s long overdue, but I’m finally posting features from my Felt Food & Projects Roundup on OneCreativeMommy.com. Year great ideas will be featured tomorrow. Don’t forget to stop by and grab a featured button!
ReplyDeletewonderful post quality embroidery digitizing services great quality #@
ReplyDelete