Monday, March 19, 2012

Easy Inexpensive Flower Barrette Tutorial

Spring is in the air.  Everywhere I look, flowers are blooming.  I figured it was the perfect time to share my flower barrette tutorial.  I promise, you don't need a green thumb to create these flowers.


Supplies:
Flowers
Rhinestone or bead
Glue
Barrette

Let's get started:
Grab some flowers. You'll want a bundle of flowers that are made up of single layers of petals. I found a bundle of flowers at Joann Fabric during their half off sale for $1.50 {I'll be able to make 7 barrettes from this one bundle}.


Remove the petals. The petals are usually held together with a plastic center that easily pops right off with a little tug.

I used 3 petals for my barrette {I needed to disassemble 2 flowers to get enough petals}.


Layer your petals until you are happy with the look and fullness.


Using some glue {hot gun or crafters glue}, begin gluing each petal to the next {starting with the bottom petal first}.  Glue either a rhinestone {I picked mine off of one of Grace's tiaras} or a bead to the center of the flower to cover the pin sized hole in your petal.


When your flower has dried, turn it over and glue a barrette to the back.


As easy as that, you are done.  A custom barrette completed in no time, for a fraction of the cost.


And, if you happen to have a little one that doesn't have enough hair for a barrette, attach your flower to a headband {I found FOE elastic trim works the best}.


As a barrette or a headband, for a little one or a big one {yep, I've sported these barrettes as well}, these are the perfect accessory.


Link Party Websites


Thursday, March 15, 2012

I've Been Tagged

Have you been tagged yet? There’s a tag game going around blog land, and I’ve been tagged by Maysem Ode To Inspiration. I feel like I've been included in some sort of secret society and I'm loving it!

This isn’t your old fashioned game of tag (which I used to love as a kid!)… It’s a get to know your fellow blogger type of game. Here are the rules:

RULES:
1. You must post the rules.
2. Answer the 11 questions that the tagger posted for you and then create 11 questions to ask the people you’ve tagged.
3. Tag 11 people and link them in your post.
4. Let them know you have tagged them.

Ready to get to know me? These were Maysem's questions:

1. What did you want to be when you grew up?
I wanted to be a teacher. I loved playing school and of course I was always cast in the role of teacher. Thank goodness I had a little sister to boss around, I mean, be my student.


2. If you could have one super power, what would it be?
Flying seems like a good super power but 1. I am afraid of heights and 2. I am a very nervous flyer SO, I'll go with teleportation. I'd like to be able to instantaneously pop myself any place in the world, in a Samantha from Bewitched kind of way.


3. What’s your favorite ice cream flavor?
I rarely eat ice cream {darn my sensitive teeth}. When I do, I am a sucker for Edy's Peppermint ice cream.

4. What was the last movie you saw in the theater?

The Muppets. I am not sure who enjoyed the movie more me or Grace. I grew up with the Muppets so this movie brought back really sweet childhood memories. I even shed a few happy tears while I watched it.


5. What was your most favorite craft that you made?
Grace's Halloween costume, inspired by Martha Stewart's chicken costume.


Growing up, my mom always made our Halloween costumes.


So, being able to make Grace's costume, brought back happy memories from my own childhood and made me realize that I could be a mom, just like my mom was {is}.

6. What do you prefer doing: Laundry or Washing the dishes (no dishwasher)?
I prefer laundry, of course this is in context to over doing the dishes. Do I have laundry that I am procrastinating folding, in my dryer right now...um, yes!

7. What was your favorite activity as a child?
I loved playing in the water when I was little. We'd spend summer days at my Grandparents' house eating freezie pops sporting our homemade bikinis {oh, yah, I said homemade bikinis}. Happy days, happy memories.

Me and my little sis.

8. If you can travel back to one decade, which one would it be and why?
Either the 50s or the 60s. As far as fashion goes, I think this was a stylish and classic time frame. This is probably why I am counting down the days until Mad Men returns.


9. Coffee or tea?
This girl is a tea drinker. I love Republic of Tea not only do they taste great but they come in the cutest containers.


10. Appetizer or dessert?

Appetizer, hands down. In my perfect world, at the end meal, I would be given the appetizer menu not the dessert menu.

I LOVE Wok N fire's crab cake hand rolls...yum!


11. What crafting tool/machine/supply is your BFF?
Going off track a little, I would say besides for my camera, I could not live with Photoshop elements and Picnik {now PicMonkey}. There is rarely a day that goes by that I don't take a picture of something. Even a great photo can be made just a little bit better with a few tweaks {thank goodness for photo editing websites}.

My turn to ask the questions! The lucky bloggers to answer them are:


This is all for good fun! If you don’t want to play, no worries:D For those that have not gotten tagged yet and want to play, feel free to join in! You can leave your answers in the comment area below.

1. Who is your celebrity look alike?
2. What post are you most proud of and why?
3. Are you the only, oldest, middle or youngest sibling in your family?
4. What was your favorite childhood lovie?
5. What style is your home currently decorated in?
6. What are you making for dinner tonight?
7. What made you decide to start blogging?
8. What's the story behind your blog name?
9. What was the worst job you ever had?
10. What word describes you best?
11. Who is your favorite Muppet character?

I'm not sure what is more telling, the answers I gave to the questions I was posed OR the questions I asked...hmmmm.

Wednesday, March 14, 2012

Chalkboard Contact Paper Labels

If you haven't already heard enough about chalkboard contact paper after my Scribbles Welcomed Post, here's some more chalkboard contact paper love...

Today, I cut out some labels, the middle one, I cut out by hand, the others, I cut out using my Silhouette.


Ok, I admit, I don't actually need these labels. One could clearly tell what is inside any of these containers BUT don't they make them look so much cuter?


Should I be embarrassed that I still have candy hearts in a jar? Wait...don't answer that :)

Tuesday, March 13, 2012

Boring Beam Be Gone.

This guy had a bright idea {see it there}...

Handsome husband

He decided this beam {the beam that separates our living room from our sitting room} was a bit boring...


So, he ordered some wooden brackets and painted them white {of course, I have no pictures of this process}.

Then this guy came for a visit and we put him to work hanging them...

Dear old Dad, handy man extraordinaire.

So now our once boring beam has a bit more character.


Yeah, I think it works.


We bought our brackets from the clearance sale at Van Dyke's Restorers. They have an amazing selection of reasonably priced corbels, brackets, moldings, trims and hardware. *I swear, this post is not sponsored by Van Dykes, though I wish it were :)

Monday, March 12, 2012

Easter Bunny Basket Tutorial


When I got the Easter themed Pottery Barn for Kids catalog, I feel in love with their Bunny Basket.

{image via Pottery Barn for Kids}

I tore the page out and stared it for a few days, thinking to myself, I wonder if I could make this myself. I should preface this by saying, I am a relatively novice sewer {I may excel at making fake felt food but that isn't what I would call technical sewing}.  I had no pattern so I just figured it out as I went along.  There were many bumps in the road, as you might expect.  My seam ripper got pushed to its limits but, in the end, I am happy I tried and, dare I say, succeeded.

If you have any technical skills, I welcome any feedback for tips that might make the steps I took easier for anyone else willing to try it themselves.

If you are still reading, bless you and here's the tutorial:

Supplies:
1/2 yard of white material
1/2 yard for the inside {this is more than you'll need}
1/4 yard of material for the ears
1/2 yard of batting
1/2 yard of light-weight, fusible, woven interfacing {I used Pellon brand}
Embroidery thread & scrap fabric {for the face} OR you could always use some glue and felt
Seam ripper :)
Pattern, you can download the body and the ear pattern or email me whilewearingheels @ gmail dot com (remove spaces)  and I'll email you the pattern.

Ear Construction:
1. Layering your ear white material and pink material, place right sides together.  Sandwich the batting between the layers.
2. Using 1/4 of inch seam allowance sew the ears shut, leaving the bottom unsewn.
3. Turn the ear right side out.
4. Pinch the bottom of the ear over and sew across.
* Repeat these steps for the second ear.

*You may notice, my finished ears are a different color, the seam ripper got these.

Handle Construction:
1. Cut a 20 x 3 1/12 strip of  fabric for your handle and batting.
2. Fold it in half.  The handle fabric on the inside, batting wrapped around on the outside.
3. Using a 1/4 of an inch seam allowance, sew along the open edge.
4. Turn it right side out.
5. Optional:  Top stitch 1/4 of an inch in on each side of the handle.  This gives it a more finished look.  


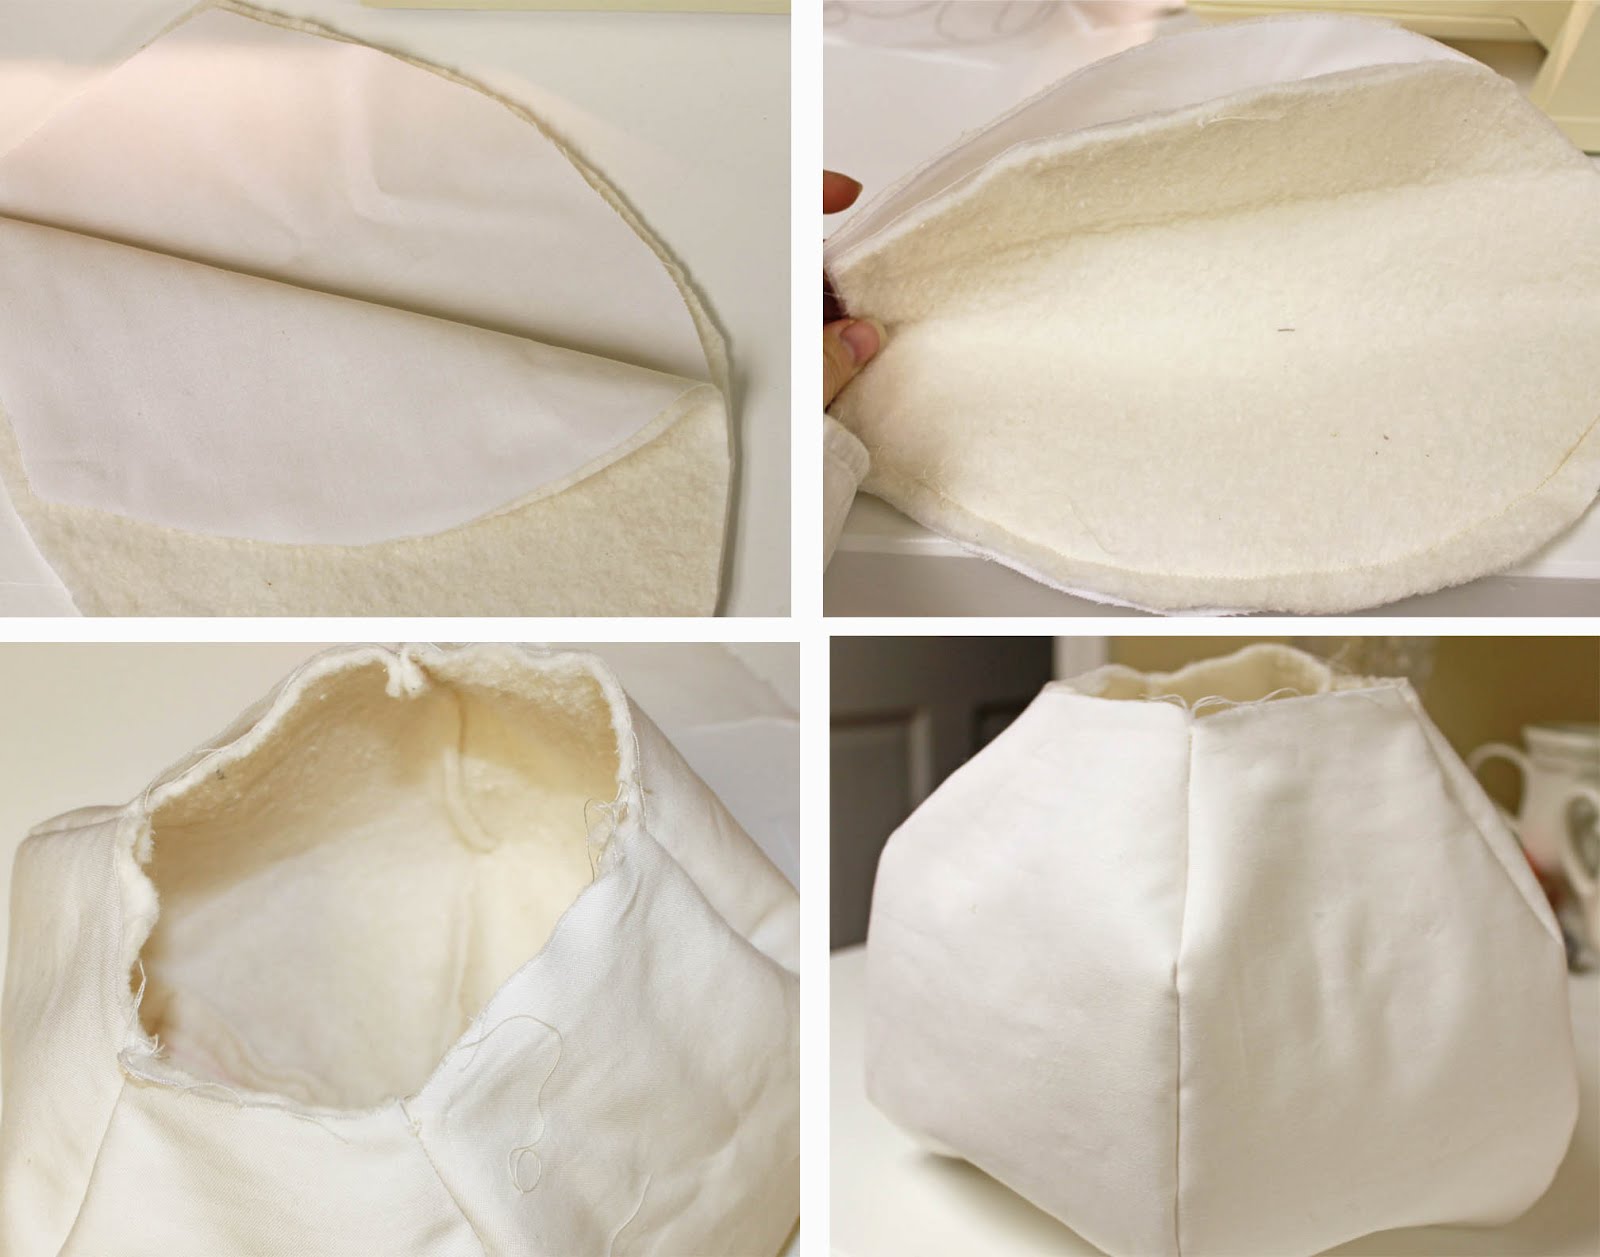
Outer Body Construction:
*fuse the interfacing to the wrong side of the white fabric before cutting out the body.  This should help give your basket more structure.  Remove paper backing from interfacing and follow the rest of the steps.
1.  Layer the batting and outside fabric together.
2. Using a 1/4 inch seam allowance, sew one side of paneling to the next side {each panel will be layered with a batting panel}.  Continue sewing each side together until all 5 sides are sewn together.
3. Turn it right side out.
*Not shown. When I turned my bunny right side out, in the center of the bottom, I still had a little opening.  I ended up sewing a circle patch over this area, to cover my hole and give a more finished look.


Inside Body Construction: 
1. Using a 1/4 inch seam allowance gradually moving towards a 1/2 seam allowance, sew one panel to the next {right sides facing each other}.  Continue sewing until all panels are sewn together.
2. Trim along the seam lines, removing the raw edge excess.
3. You do NOT need to turn it right side out {though, out of habit I kept trying to}.
4.  Stuff it into the outer body to see how well it fits.


Face Embellishments:
You have complete creative license to finish your bunny face in whatever way you please.  My only real tip, pin your ears on, so you can figure out how you want the face to look, in reference to where the ears are.

I used a water solvable pen to draw out my bunny's face.   I used dark brown embroidery thread and straight stitched her eyes.  I appliqued on a fabric nose and then embroidered a line beneath her nose, along the seam line, for her mouth.


Sewing the Inside to the Outside: 
1. Pin your ears down and your handle on {you may need to adjust needle placement when you line up the inside fabric to the outside fabric, to avoid breaking a needle when you begin sewing}.
2. If you are a veteran sewer, place the outside of your bunny into the inside section of your basket {right sides facing together.  Sew around the the bunny, leaving about a 3 inch section unsewn towards the back of the bunny.
   * If you are a novice sewer, like this girl, I did not insert the bunny into the inside section.  I opted to pin the first 2 sections of the outside to the inside, covering the face of the bunny.  I did this 1. assure my ears were properly sewn into place and 2. to give me the confidence that I was attaching the lining correctly.  After I sewed these 2 sections to the inside of the basket, I turned it right side out to check on my progress.  For the remaining sections, I stuffed the outside of my bunny back into the inside of my bunny and sewed the remaining 2 panels closed.
3. Turn the bunny right side out through the opening you left unsewn.

You can see the patch I sewed in the 1st picture, to cover my hole and seams {referenced in outer body construction}.
Turn your bunny basket right side out.  I decided to top stitch the top of the basket, to give the ears and the handle a bit more support.  Top stitching is optional, not necessary.


Cute, right?


The only thing missing, a fuzzy little tail.  Thank goodness for Goodwill.  I found a Santa hat for .49 cents {today}. 


Heck yeah...I cut that pom pom off and sewed it to my basket.


Tada...


Some bunny already loves this.


*If you should attempt to make this bunny, best of luck. I did try to explain, as best I could, the process I used. Again, I am not a technical sewer. So, if you are a novice sewer like me, don't let any project intimidate you, grab your seam ripper, know it's OK to make a mistake and remember sometimes things are even more beautiful flawed. 

©2011. For personal use only. Please do not use this tutorial for distribution or resale purposes. You are welcome to link back to this site. All borrowed content must be given proper credit. This is the intellectual property of While Wearing Heels.

Thursday, March 8, 2012

Scribbles Welcomed

This may sound crazy BUT yesterday, while looking at this cabinet...


I thought, that is the perfect space for some scribbles.

You're probably wondering, what's the catch? You got me. I don't actually want scribbles on my cabinet. Cue chalkboard contact paper.

I know I am probably late joining the chalkboard contact paper craze but I'm on board now so buckle up.


I drew out a fancy design with chalk {brilliant, right}, cut it out and put it in place.


The best part, chalk can easily be wiped off and, when the time comes, the contact paper can easily be removed with no damage to my cabinet.


So, scribble away my little Picasso, scribble away.

Wednesday, March 7, 2012

A box arrived.

A nearly 50 pound box arrived at our house this week. It looked like this...


The inside of the box, which included a sheet of instructions of which the first line read: DO NOT PANIC, looked something like this...


In case you haven't already guessed what it is, it's a dollhouse! When it's done, it's supposed to look like this...


This will lovingly be put together by my husband as a gift for Grace's 4th birthday.

I am a little worried that by the time it's done, my handsome husband will look like this...


But it will all be worth it because I know that when Grace sees it, she'll look like this...

Related Posts Plugin for WordPress, Blogger...