Friday, December 21, 2012

The Great Christmas Card Reveal

Before I reveal our 2012 Christmas card, I have to confess it was 100% inspired by A Little Glass House

As I mentioned, this year, we opted to leave Riley out of our Christmas card.


Riley seemed offended when we broke the news to her.  


She hoped maybe by romping with a stick in the background, we would reconsider.


She even went the stealth mode.  Fortunately, this wasn't Grace's 'money shot'.


In the end, though Riley was incredibly persistent, we went with this picture.


With a caption that said: The Christmas Spirit Drives Even The Smallest Ones' hearts.


And, wouldn't you know it, we've already been asked, where is Riley. 

Looks like she'll be back on next year's card.

Thursday, December 20, 2012

Christmas Goodie Bags: Write a Letter To Santa Kit

Guess who is in charge of the goodie bags for the preschool Christmas party?

That's right, this mom.

Trying to be clever and avoid using the expected candy cane filler, I decided to put together a 'write a letter to Santa kit' for the Christmas party goodie bags.


 So, I headed to the dollar store and Michaels to pick up some supplies. 

At the dollar store, I bought pencils, erasers, a snowflake-I'd like to think that the letters can be sent via snowflake to the North Pole (a stretch I know but I needed to fill the bags frugally and for a dollar a pack, those snowflakes will work).


At Michaels, I bought a package of decorative paper for $2.50 and some bubbles for $3 (mostly because they came in a pack of 18 and that's how many goodie bags I needed to fill).

For each goodie bag, I rolled up 2 sheets of paper and tied a tag that said: 'WRITE A LETTER TO SANTA KIT' so the parents knew what the goodie bags were for.


And, since I was already in an ornament making sweat shop, I decided to make monogrammed ornaments  for each of Grace's classmates all18 of them!


With a budge of almost nothing, I had to make name tags as well.  I thought these paint chip ornament tags were perfect.


18 goodie bags for .77 cents a piece, $14 total.

 
Now I'm off to go and deliver them...on a snowflake :)

Wednesday, December 19, 2012

Photo Gift Tags

Ever wonder what to do with some of the sweet and sometimes not so sweet pictures you take throughout the year of your children?

Why not turn them into gift tags...from Santa.


What better reminder that Santa has been watching all year.

That he sees when you've been good or bad.


If you are like me and delight in taking pictures of your misbehaving children


And, of course, pictures of your children being sweet.


Pull those pictures into PicMonkey, add a funny caption and print them out.  Attach them to your gifts.


Of course, this makes me giggle BUT I also hope that it will add to the magic of Christmas for Grace. 


I also hope it will help Grace continue to believe in the magic of Christmas.


Link Party Websites

{T} * Be Inspired by Elizabeth and Co.   * Tutorials and Tips on Home Stories A 2 Z   * I gotta try that   * Tips and Tricks Tuesday at Stringtown Home  * Delicate Construction * The Winthrop Chronicles  * Open Call Tuesdays on Salt Tree * Adventures of a DIY MOM * Take a look Tuesday at Sugar Bee Crafts * Blackberry Vine Tuesday To Do Party Coastal Charm * My Uncommon Slice Of Suburbia  * Tip Junkie   

{W} *In Bloom Link Party *Adorned from Above * All Star Blogging Party *Well Crafted Wednesdays *What I Whipped Up Wednesdays * Homemade by You Wednesday * Whimsy Wednesdays  * Blue Cricket Design  * The Fun In Functional * What I learned Wednesday *   Home Happy Home * Someday crafts 

{TH} * Farm Girl Fest* Thursday Linky Party at Osie MoatsTaylor House ThursdayThursday's Temptation Link PartyDelightful OrderA Glimpse Inside  *  The Crafty Blogstalker * Made In a Day  * Somewhat SimpleA Little Knick Knack* House of Hepworth's * Chic on a Shoestring * 52 Mantels *
 

Monday, December 17, 2012

Love Letter Ornament

*I share this post with a heavy heart.  Tomorrow I will be participating in a day of silence in remembrance for the victims lost to the tragedy in Newtown, CT.  If you are a fellow blogger, I encourage you to do the same.


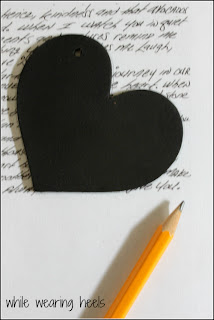
Tuck away in a box, I have the letter my husband wrote to me the day that we got married.  Sadly, though, tucked away in a box, I rarely see it or appreciate it.  This year, I decided to turn it into an ornament.


I scanned the original letter and printed it out on copier paper.  Using a wooden heart, I traced out the exact shape I needed.


Using some Mod Podge, I applied a coat onto the wooden heart and placed my paper heart on top.  After that dried, I applied another coat {a sealing coat} of Mod Podge over the top of the paper heart. 


I added a key, yes the key to my heart {cheesy?} and some twine to hang the heart from.


So, now instead of this beautiful letter being tucked away in a box, year after year, I can hang it on my tree and appreciate the happy memories that come flooding back.


And, yes, my beautiful letter referenced In N Out Burger...my sweet husband knows the way to my heart.


Link Party Websites

{T} * Be Inspired by Elizabeth and Co.   * Tutorials and Tips on Home Stories A 2 Z   * I gotta try that   * Tips and Tricks Tuesday at Stringtown Home  * Delicate Construction * The Winthrop Chronicles  * Open Call Tuesdays on Salt Tree * Adventures of a DIY MOM * Take a look Tuesday at Sugar Bee Crafts * Blackberry Vine Tuesday To Do Party Coastal Charm * My Uncommon Slice Of Suburbia  * Tip Junkie   

{W} *In Bloom Link Party *Adorned from Above * All Star Blogging Party *Well Crafted Wednesdays *What I Whipped Up Wednesdays * Homemade by You Wednesday * Whimsy Wednesdays  * Blue Cricket Design  * The Fun In Functional * What I learned Wednesday *   Home Happy Home * Someday crafts 

{TH} * Farm Girl Fest* Thursday Linky Party at Osie MoatsTaylor House ThursdayThursday's Temptation Link PartyDelightful OrderA Glimpse Inside  *  The Crafty Blogstalker * Made In a Day  * Somewhat SimpleA Little Knick Knack* House of Hepworth's * Chic on a Shoestring * 52 Mantels *
 

Friday, December 14, 2012

Barbie Ornament

In the ornament making sweat shop, I have admittedly been in this past month, I couldn't forget about making a special ornament for Grace.

While I make ornaments, I often multi-task by playing Barbies with Grace.  It seemed only fitting, Grace's ornament be a Barbie ornament.


Supplies Needed:
Felt
Batting or extra layer of felt {to fill your ornament with}
Black Embroidery Thread and Needle
Ribbon {for the ornament loop}
Water Soluble pen
And, the Barbie pattern,  which I had pinned from Frou Frou by Heathersue but no longer is up on her site, SO if you want to make one of your own, you can use the pattern I pinned.

Begin by tracing the Barbie pattern onto your felt. 


Using a stem stitch, embroider along the outline.


On the back of this ornament, I decided to embroider Grace's name with a TM and the date.  I wanted it to have a Barbie like feel to how I personalized it.  This is optional, the ornament is just as cute without anything on the back.


When you have finished your embroidery, cut your Barbie out.  I used a circle shape.  Cut the back out in the same size and the batting or extra layer of felt out in a slightly smaller circle. 


All that is left to do is assemble your ornament.  Fold your ribbon over into a loop, apply a generous layer of glue above the ribbon loop and below it as well as around the perimeter of the circle.


Place the batting or extra layer of felt down in the center of the ornament, making sure there is still plenty of glue left around to attach the top layer. 


Attach the top layer, let dry and then admire on your tree.


Thursday, December 13, 2012

Put A Pin In It - Christmas Ornaments

And, the ornament making continues.  This round of ornaments were all inspired by pinterest.

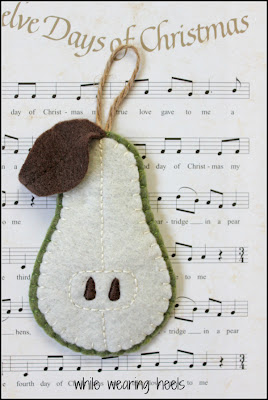
On the first day of Christmas my true love gave to me, a partridge in a pear tree...felt ornament.  Lil fish studios has the PDF pattern for this adorable felt pear {and apple} for $3.  This embroidered felt pear took about 30 minutes to complete.


Last year, thanks to Zakka Life, I was able to create this sweet little bird who lives in a stylish embroidered felt bird cage ornament.

My favorite ornaments from last year and this year are these monogrammed felt ornaments, tutorial provided from Made.  Not only have I used them as ornaments, I also add them to presents as gift tags. 


I entered not 1 but 4 ornament exchanges this year {what was I thinking?}.  Thanks to Better Homes and Gardens I was able to make a felt poinsettia ornament for one of my ornament exchange buddies who claimed to love poinsettias.


Elsie Marley helped me make this half eaten felt gingerbread man ornament...who looks so delicious, someone took a few bites out of him. 


I made this dove, last year, from a Purl Bee turorial, though, it seems they are now charging for the pattern. However, they do have a similar fabric bird ornament available as a free tutorial.


*The next two ornaments were inspired by things I saw on pinterest before I blogged.  I can't seem to find the source from which my inspiration was drawn.  If you know the source, please let me know.

Two years ago, Grace asked for a cat for Christmas, but we have Riley so instead of getting her a real cat, I made her a cat ornament.


And, no tree is complete without a Volkswagen van.  The license plate was the perfect place to add some personalization.


I'm always looking for ornament ideas, if you have one you think I would like, let me know in the comments.  Maybe next year you'll be in my 'put a pin in it - Christmas ornaments' post. 

Wednesday, December 12, 2012

Chalk Board Gift Tags

Tis' the season for gift wrapping.

We all know, it's all about the packaging.  Why not start your wrapping with some reusable chalk board tags?


Head over to your local hobby store and check out the wooden shapes they have.  I bought mine for less than .40 cents a piece.  They have some really cool shapes, like the United States {one would think I might have a United States obsession, I assure you, I do not}.


Either you or your talented assistant can drill a hole into your wooden shape, to allow for a ribbon or twine to be looped through later.


Using some Chalk Board Spray Paint, give both the front and the back of the wooden shapes 2 coats of coverage.


Once dry, you have a blank canvas.


Grab some ribbon and some chalk.  Fill out your gift tag and attach it to a beautifully wrapped gift.


It doesn't even need to be on a Christmas gift.


I'll *chalk* this up to a Christmas miracle that at least 2 more presents are wrapped.

Link Party Websites

{T} * Be Inspired by Elizabeth and Co.   * Tutorials and Tips on Home Stories A 2 Z   * I gotta try that   * Tips and Tricks Tuesday at Stringtown Home  * Delicate Construction * The Winthrop Chronicles  * Open Call Tuesdays on Salt Tree * Adventures of a DIY MOM * Take a look Tuesday at Sugar Bee Crafts * Blackberry Vine Tuesday To Do Party Coastal Charm * My Uncommon Slice Of Suburbia  * Tip Junkie   

{W} *In Bloom Link Party *Adorned from Above * All Star Blogging Party *Well Crafted Wednesdays *What I Whipped Up Wednesdays * Homemade by You Wednesday * Whimsy Wednesdays  * Blue Cricket Design  * The Fun In Functional * What I learned Wednesday *   Home Happy Home * Someday crafts 

{TH} * Farm Girl Fest* Thursday Linky Party at Osie MoatsTaylor House ThursdayThursday's Temptation Link PartyDelightful OrderA Glimpse Inside  *  The Crafty Blogstalker * Made In a Day  * Somewhat SimpleA Little Knick Knack* House of Hepworth's * Chic on a Shoestring * 52 Mantels *
 

Tuesday, December 11, 2012

Cloud Shaped Hand Warmers

Looking for a silver lining to the days turning colder?  Look no further.  Why not make some cloud shaped hand warmers so that even though it may be cold outside, your hands can remain nice and toasty.


To make your own, gather the following supplies:

Fleece {I used white}, scissors, rice, needle and thread
*Optional:  embroidery thread to add an embellishment to your cloud.

Using this pattern:


Cut 2 cloud shapes out of the fleece.


Either by hand or with your sewing machine, sew around the perimeter of the cloud leaving a gap...


big enough to insert rice into.


Once filled with rice, hand sew the opening closed.


Pop them into the microwave for about 30 seconds, put one in your pocket and enjoy having your hand warmed up.


They are the perfect silver lining for any cold day.


Or, perhaps these cloud hand warmers will make you feel as if you are on cloud nine.


*Optional:  if you want to embroider an embellishment to your cloud, embroider it prior to cutting out your shape.


After it's embroidered, cut out your cloud shapes and follow the steps above.


They would be perfect for stocking stuffers or even paired with a Starbucks gift card as a teacher gift.


*Don't have time to make your own?  These are now for sale in my Etsy shop.


And be sure to check out my other Christmas inspired posts:

Star Wars Ornaments
DIY Pottery Barn Candle
DIY Advent Calendar
DIY Santa Beard
Christmas Flower Boxes
Pine Needle Gift Tags
Pucker Up Ornament

Related Posts Plugin for WordPress, Blogger...