Monday, May 20, 2013

Art Birthday Party - Repost

In honor of Grace's 5th birthday(!), this week I'll be sharing my favorite birthday posts.  On Friday, I'll give you a chance to link up your own favorite party post(s).

Without further ado, I present to you, Grace's 3rd birthday party (again). 

Color, paint and play as we celebrate Grace's 3rd birthday. Arts and crafts was the theme of the party from start to finish. If you are interested in the details, keep reading...

Since the party was a crafting themed party, I focused mainly on our crafting center.
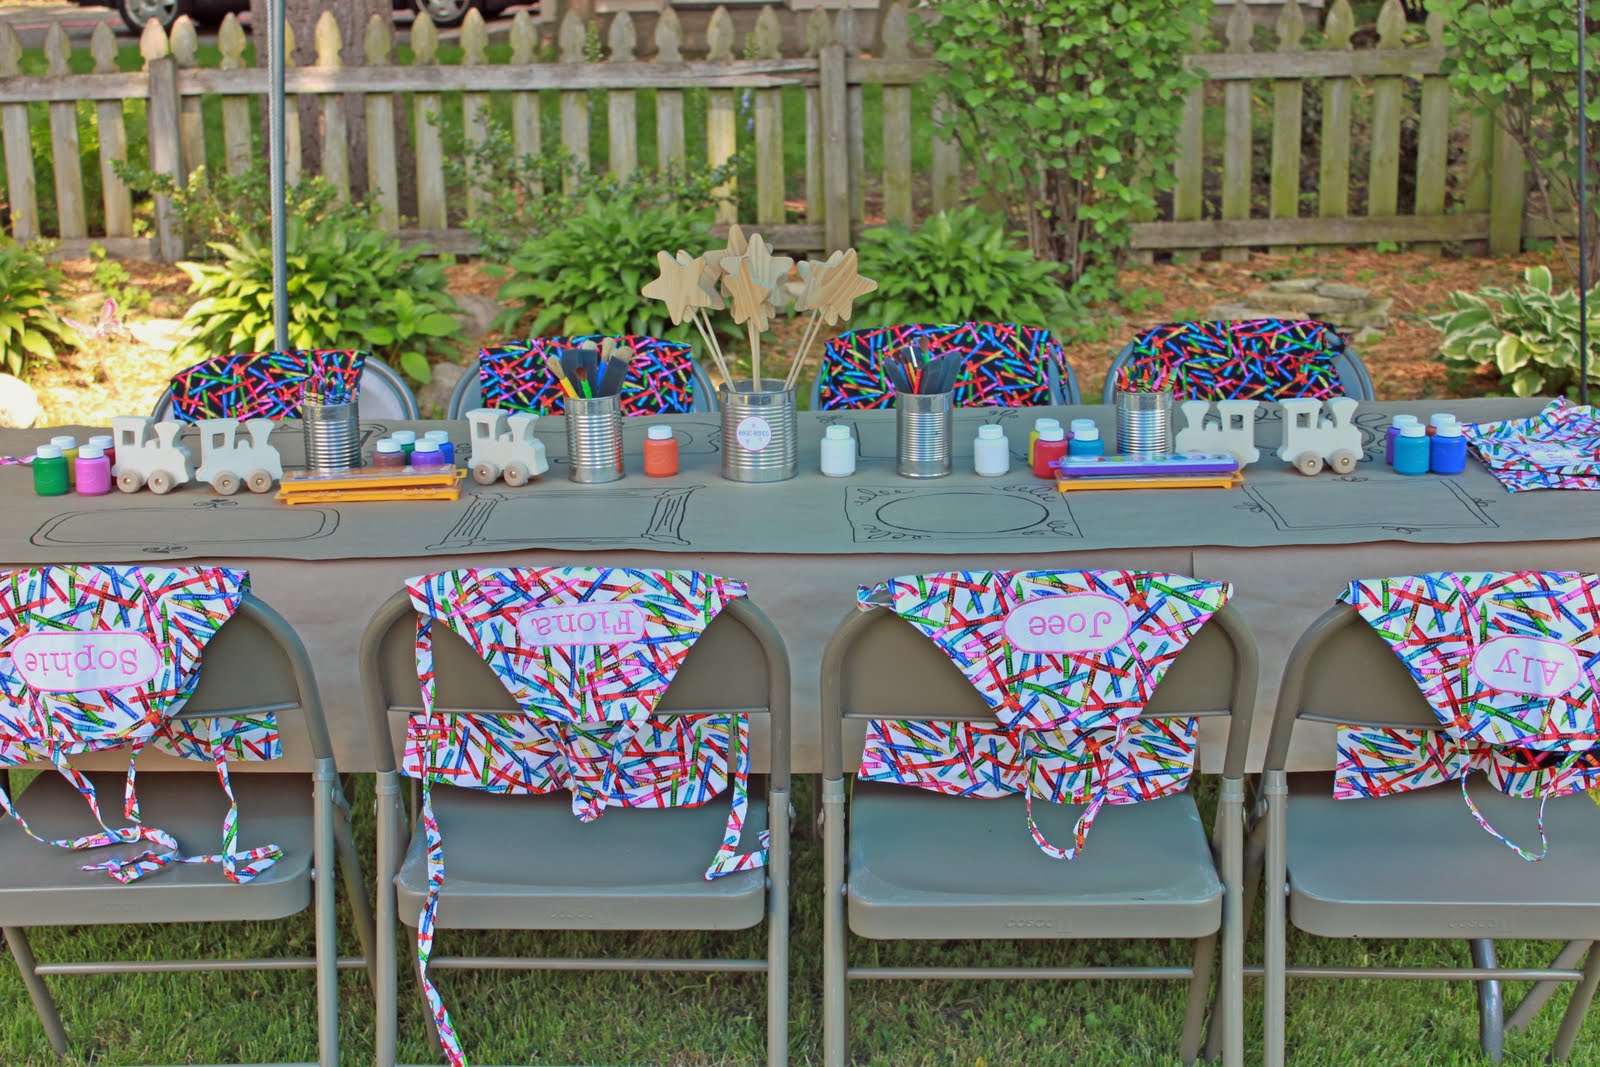

To cover the table, I used 2 rolls of packaging paper, from the dollar store. At each seat, I attempted to draw a frame.


Instead of recycling my cans, for a month, I kept them figuring they would make perfect containers for crayons and paint brushes. The table had an assortment of washable (these are 3 and 4 year olds after all) paint, water colors and crayons.

 
At Hobby Lobby I was able to find wooden wands for $1 that the girls painted and $2 wooden trains, with wheels that actually moved, for the boys to paint.


Every artist needs a gallery. I found a simple and AMAZING tutorial here that walks you through the process of converting pictures into coloring book pages. I made one for each artist but definitely had a favorite or two. Thanks Photojojo for walking me through the process!


Party favors are my favorite part of any party. I had so much fun figuring out what our little crafters would take home with them. Fortunately, crafting runs in the family, my mom made all the personalized aprons out of the most adorable crayon material.


I spelled each guest's name out of crayons, you can see the tutorial here, and used that as not only a party favor but their gift tag. I also sent them home with 2 extra copies of their coloring book page.


Having focused so much time and energy on the crafting table, our decorations were kept simple (if you read between the lines this translates into 'I ran out of time'). 3s, balloons and tissue paper poms decorated the house and outside, though, it was so hot that by the time the party started most of our balloons popped. We also left out a jar for people to leave birthday wishes for the birthday girl. I love anything that has an element of memory keeping, which is probably why I have over 5,000 pictures of Grace and she's only 3.


Yes, we had one of those parties with a photo booth area.


The frame was suspended using heavy gaged fishing line. Eyelet hooks were added to the ceiling of our porch and back of the picture frame. The fishing line was strung between both the hooks on the ceiling and the hooks in the frame. It did take time to get the frame level and hung straight. If you don't have the time to hang a frame, we also took some pictures holding the picture frame.


Hung or held, the pictures taken using the frame were among my favorites. I can see why this is such a popular trend right now.


The theme of the party started with the painter's palette invitations.


Continuing that theme and inspired by the painter's palette cupcake tray I saw here. Using a jig saw and a piece of scrap wood, we were able to create our own version.


 For the cupcakes, I started with white store bought icing and added a few drops of food coloring to mimic different shades of paint.


All in all, I would say the party was a success. Memories were made. Great pictures were taken. Most importantly, the kids all had fun.


Wait until you see what we've come up with for her 5th!

Friday, May 17, 2013

If Only...

When I was growing up, I desperately wanted to be Samantha from Bewitched.  


I am now convinced, I gave up on my dreams too soon.

On the days I am trying to find the time to fill my flower boxes.


I wish I could just wiggle my nose and without getting dirt under my finger nails, or breaking a sweat, or chasing after the dog that just tried to steal the flowers, my flower boxes would magically be filled.


Or on the days when I am trying to survive one of these...


I could just wiggle my nose and we could all enjoy the joys of nap time instead.


Or, when my street inevitable floods every year and for a few hours I own waterfront property...


I could just wiggle my nose and enjoy this view of the water instead.


Yes, Amy of yore, you gave up on your dream too quickly...

Wednesday, May 15, 2013

Finger Puppet Stand

Yesterday, I showed off Ninja finger puppets


My favorite way to display finger puppets, even the silent deadly kind, is on a finger puppet stand.


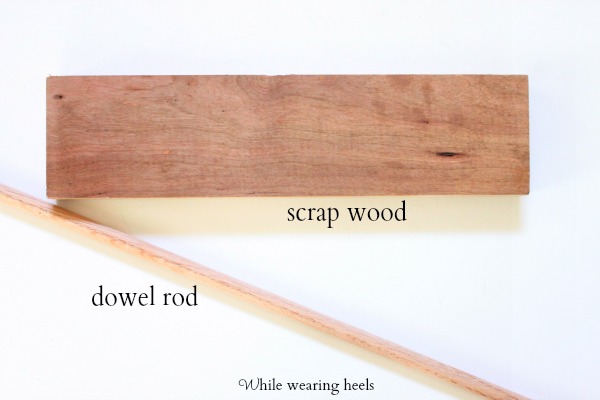
The steps are fairly simple.  Get some scrap wood, size depends on how long you want to make your stand.  You'll also need a dowel rod.


Optional:  You can router the edges of the scrap wood.
*You can also buy beveled plaques very similar at any hobby store for a $1-$2.


Mark your base approximately where you want the holes to go.  Using a drill press, drill holes into the base without going all the way through.  Roughly about a 1/4 of an inch depth should be enough.


Cut your dowel rod into approximately 3 inch sections.

Grab your stand, dowel rods and wood glue.


Glue the dowel rods into place.  Once in place, you may want to place another piece of scrap wood over the dowel rods.  Tap them into place using a hammer to provide a more secure attachment.  Allow plenty of time for them to dry and set.

Decide what color you want your stand to be and apply at least 2 coats of spray paint.


Place your finger puppets upon the stand and proudly display.


And, yes, we make a lot of finger puppets in this house.

Tuesday, May 14, 2013

Ninja Finger Puppets


If you want to make your own set of Ninja finger puppets, gather the following supplies:  felt (black, white and color of your choice for the belt), scissors, needle and thread (optional:  glue).


Using this pattern...


Cut your ninja pieces out of felt.


To make the Ninja eyes, place the white felt face onto one section of the ninja body.  Insert your needle, threaded with black thread, through the back of a single section of the ninja body into the white face.  Do an angled straight stitch roughly where the eyes should be.  Under the angle stitch, do a few smaller stitches to act as the eye.


Ninja eyes...the better to see you with.

To attach the ninja belt you can either glue it down OR using a needle and red thread, sew the belt onto the ninja body, tucking the flap under the belt securing it with the stitches through the belt.


Layer the ninja bodies together and do a running stitch to secure the front and the back of the ninja body together, leaving the bottom unsewn.


Of course, one ninja is never enough, so make a few.


And, yes, I have mad ninja skills with felt :)

Link Party Websites


{T} *From Dream to Reality Link Party ** Thursday Linky Party at Osie Moats * Be Inspired by Elizabeth and Co.   * Tutorials and Tips on Home Stories A 2 Z   * I gotta try that   * Off The Hook Link Party  * The Winthrop Chronicles  * Open Call Tuesdays on Salt Tree * Adventures of a DIY MOM * Take a look Tuesday at Sugar Bee Crafts * Blackberry Vine Tuesday To Do Party Coastal Charm * My Uncommon Slice Of Suburbia  * Tip Junkie   

{W}*Riverton Housewives Round Up *In Bloom Link Party *Adorned from Above *Well Crafted Wednesdays *What I Whipped Up Wednesdays * Homemade by You Wednesday * Whimsy Wednesdays  * Blue Cricket Design  * The Fun In Functional * What I learned Wednesday *   Home Happy Home * Someday crafts 

{TH} Delightful OrderA Glimpse Inside  *  The Crafty Blogstalker * Made In a Day A Little Knick Knack * House of Hepworth's  * 52 Mantels *
 

Monday, May 13, 2013

Goodwill Hunting Roundup

Goodwill hunting roundup was almost cancelled this month.

My go to Goodwill store has undergone a makeover.  To most, the makeover was probably appreciated.  The aisles were widened.  More shelves were added.  Things became organized.

Sigh.

I have determined part of my thrifting success could be attributed to my desire to dig or hunt for what could be buried in piles.  With organized shelves, no digging is required.  All the fabulous finds are right there for all to see.

I had considered simply showing you my 'flea market find'...a vintage porcelain vase (?), made in England (and we all now, anything made in England has to be fabulous, right?).  It was missing a lid but when filled with flowers, that doesn't really matter, does it?  The tag said $7 but at flea markets you rarely pay what is on the tag.  We paid $6 for this sweet vase.


Close to giving up on Goodwill altogether, this past Friday night, I dragged my handsome husband over there.  Within 5 minutes, I spent more at Goodwill than I have all year.

I came across this bunny deviled egg platter for $3.99.  I remember seeing it being sold at Target just before Easter for $17.99.  I saw it shortly after Easter, on clearance for $9.99 and still left it sitting on the shelves.  Well, when this bunny platter followed me to Goodwill with a $3.99 price tag, I could no longer play hard to get.


Moments later, I spied this green glass footed bowl for $2.99.  It has a vintage vibe to it, though, I am not sure if it is actually vintage or not. 


For $1.99, this vintage floral platter made it's way into my hands. Sweet yellow flowers go around the border of this platter.  (Curious why I am collecting so many dishes?  I have another party to plan!).


The real reason I dragged my husband to Goodwill was because I had spotted this vintage desk through the window.  It was $39.99 so I hemmed and hawed about whether we should or shouldn't buy it. 


We walked around the store for a few minutes while I thought about the beautiful details like the dovetailed drawers, the curves and the beautiful wood detail.  


Before we decided to buy it (which we did eventually do)...

We came across a headboard for a twin bed.  Grace is still in a toddler bed, which she is QUICKLY outgrowing.  Though this headboard wasn't quite what we had in mind for her, it had potential $14.99


So, for $14.99 we decided to add this solid wood headboard to our cart as well.


Both the desk and the headboard will get a little makeover, with a little help from my friend...


And, I do believe I'll be steering clear of Goodwill, for the sake of my wallet, for a few weeks.

What treasures have you found recently?

Linked up to:


Related Posts Plugin for WordPress, Blogger...