Showing posts with label easy. Show all posts

Monday, March 10, 2014

Personalized Onesies

What do you get for a mom to be that has everything?  Personalized onesies. 

Using Transfer Paper, you can easily personalize onesies in some fun and unique ways.

The ever popular birth date onesie is a fun photo prop for any newborn.


The detail tutorial can be found here, if you want to make a birth date onesie of your own.


Depending on if you give this as a gift before the baby arrives or after the baby arrives, the birth date can be circled when you create the calendar month OR you can throw in a Sharpie for the date to be circled after the baby arrives.


The second onesie I personalized, used a similar technique. 


I edited the baby shower invitation, taking the very cute and colorful baby equation and, again, was able to transfer it onto a onesie.


 I used this same technique here, transferring the logo of the father to be's band onto a onesie. 


The hardest thing, in making these personalized onesies, remembering to print the mirrored image. 


Personalized onesies, the perfect one of a kind gift to give someone that has everything.

Wednesday, February 12, 2014

Embroidered Felt Heart Tutorial

What better way to tell someone they have your heart than by giving it to them?

These easy to make embroidered felt hearts can be personalized to suit your Valentine.


Whether you want to give them the key to your heart, a sweet sentiment of XOXO or Cupid's arrow, the possibilities are endless.


To make your own embroidered felt hearts:

Cut two hearts out of felt.  I used pinking shears to give the edges of my hearts more of a design flair.  Embellish the front of the heart with a design of your choice.  Embellish your design through embroidery or by adding buttons.


Secure the front of your heart to the back of your heart by doing a simple running stitch around the boarder.


Attach a pin to the back of your heart and it becomes a brooch.


Whether you get detailed in your embroidery...


or chose a simple design...


these embroidered felt hearts will have your Valentine mooning over them.


Monday, February 10, 2014

DIY Embroidered Handwriting Keepsake

Turn your child's handwriting into an embroidered keepsake.  Those carefully written letters should be preserved and displayed.  A simple and easy way to do that, with embroidery thread.


To create your embroidered keepsake you'll need the following:  fabric, embroidery hoop, water soluble pen, needle and thread.


Enlist your artist of choice to write something onto your fabric.


Center the written sentiment in your embroidery hoop.


Begin embroidering. I used a back stitch for the letters.

To back stitch bring your needle and thread up through the back of the fabric.  I started at the top of the L.  Sew a long stitch forward, bring your needle down.  Return your needle back up, leaving space, approximately the same size as your first stitch.  Return your needle back down, where your first completely stitch ended.  Repeat.


At the end of love, I decided to punctuated it with a heart.  


Love should always come from the heart.


 Love was the first word Grace learned to spell. 


Love is what this sweet child of mine shows me every single day.


Love, written by a 5 year old, will be a keepsake I hold dear for always.

Thursday, February 6, 2014

Valentine's Decorating

I happen to be one of those people that decorate for Valentine's Day. 

February can be a gray, dreary, cold month in the Midwest.  Valentine's Day gives me an excuse to add some happy, cheery bright colors, flowers and a heart or two to my decor and, in turn, it brightens my mood.

An easy and inexpensive way to change up decor is with pillows.


I whipped up some pillows, in less than an hour.  Using some heat transfer vinyl I customized each with LOVE and a heart.


And, those pillows are getting love...


From the dog.  Sigh.

Valentine's Day and flowers (ok, and probably chocolate) go hand in hand.

I've become a sucker for the $3.99 bouquet of roses at Aldi.  Such an inexpensive way to add some color and a good reminder that spring will eventually return.


I'm slightly obsessed with all things letter related.  I went through my collection of letters and was inspired to add an XO (hugs and kisses) for another subtle Valentine's touch.


Rustic coasters are scattered about. 


Herman, the head that usually wears my eye glasses, is donning a heart shaped eye patch...he obviously doesn't mind making a spectacle of himself for the sake of Valentine's.


Not only do I decorate the house...but I also make sure that Grace gets 'decorated'.  She has lots of heart sweaters and pretty hair accessories to wear.


Which reminds me, I need to make sure she has a chance to show off her LOVE dress before Valentine's day.


 And, though I wish this weren't the case, our front yard is still decorated with some ice cold hearts. 


Here's hoping we get some warmer weather soon and those cold hearts melt.

Do you decorate for Valentine's Day?

Monday, February 3, 2014

Valentine Felt Heart Straw Embelishment or Pencil Topper

It's almost Valentine's Day...That means, you have an excuse for adding hearts to things like paper straws.

What's better than showing your Valentine you love them than sharing some ice cold milk and a cupcake?  Sticking a paper straw in that ice cold milk with a felt heart reminder that you 'heart' them.

This quick and easy felt heart can be made in a few simple steps.


You'll need:


Start by cutting out your hearts.  You'll need two hearts a piece, preferably the same color.


Using your needle and thread, do a running stitch to secure the front of the heart to the back of the hear.  You'll need to leave a portion of the top and bottom of the heart unsewn for the straw to fit through.  When you get to very top and very bottom of the heart, instead of doing the running stitch through both layers of hearts, simply go through only the top layer, leaving a hole or pocket for your straw. 

If you'd rather not 'sew', secure the hearts together with tacky glue instead.


Slip it onto a pretty paper straw and sip with love.


Your heart could also be used as a pencil topper.  The perfect inspiration for all your love letter writing.


Inspired to go make one of your own?

Or maybe you now want to go drink some ice cold milk and eat a cupcake...that's OK too.

Tuesday, January 28, 2014

Rustic Love Coasters Tutorial

I love the idea of incorporating rustic natural touches in my home.  And when I am able to incorporate them into holiday decor, even better.

Valentine's Day is one of my favorite holidays.  The theme of love and hearts really speaks to me.  Every year, I happily add a new heart creation to my Valentine's Day decorations.

This year, I decided to make some Rustic Love Coasters.


Want to make a few of your own? 

You'll need some wooden coasters, cut from logs.  Need a tutorial...I've got you covered.  Check out my Wood Coaster Tutorial.

You'll also need some chalkboard paint.


Draw a heart, in pencil, on your coaster.  And, yes, if you have a snowman pencil, even better.


Fill in your heart using chalkboard paint.


Allow the paint to fully dry.

Then, write in chalk 'love' or 'amore' or your initials + your love's initials.


 Use it as a coaster, paperweight or simple decoration


Regardless what you do with these rustic love coasters, I hope you LOVE them.


*Don't forget, there is still time to sign up for the Uncommon Goods giveaway where one lucky While Wearing Heels reader will win a $50 gift certificate.

Tuesday, January 7, 2014

The 30 Minute Apron Tutorial

Does your little one have a play kitchen?  Or, do they like helping you cook or bake?  This (give or take) 30 minute apron will let them look stylish doing either.


You'll need fabric and a sewing machine.

For this child size apron you'll need approximately 44 inches by 12 inches of fabric for the apron skirt.  The tie will require approximately 66 inches by 3 1/2 inches (though, I did elect to make my apron tie long enough for a big beautiful bow to be tied).

Start by folding your fabric for the apron skirt in half, right sides facing each other, or cutting out two sections of your fabric to measure 22 inches by 12 inches when folded together.


Optional:  Add curved edges to the bottom of your apron.  To easily add curves, use the curve of a plate as a template.  Line up along one corner of the apron, using a rotary cutter cut along the curve.  Fold your fabric in half, to cut the same curve on the other side of the apron.


Now it's time to sew!  Sew down one side of your apron (or if you folded your fabric in half - start sewing at the rounded edge, beneath the fold), across the bottom and back up the other side of your apron.  Leave the top of the apron open.

Clip the corners of your apron, if you opted to curve your edges.  If you left your corners square, clip the points of the edges off, close to seam line.


Turn your apron right side out and press.


Optional:  Top stitch down one side of your apron, across the bottom and back up the other side of the apron.  Though not necessary, top stitching gives your apron a finished more tailored look. 

Optional:  Gathering the fabric at the top of the apron.

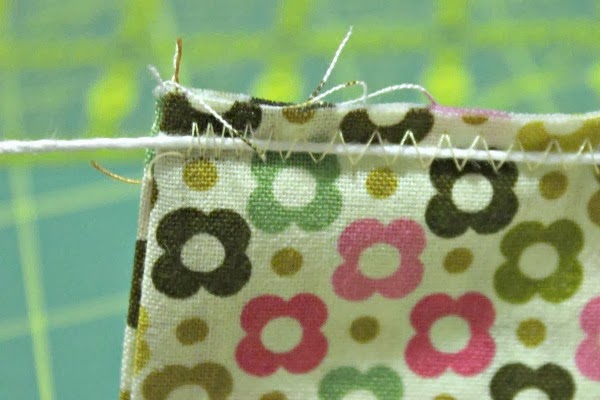
To gather the fabric at the top of the apron, grab some string, long enough that it spans the length of the apron.  Do a zig zag stitch wide enough that it goes over the string.


Hold one end of the string in place, while you gently pull the other side of the string, gathering the fabric as you go.


Try and space the gathered fabric evenly so one spot isn't more gathered than another spot.  You should be able to freely adjust the fabric, as long as you hold the string securely.


Time to create the tie.  Want to save a step, use wide ribbon as your tie.

Or you can make your own tie...

Your tie can be made long and wide as you want.  The tie I made is roughly 66 inches by 3 1/2 inches.  To make it long enough, I needed to sew 2 sections of strips together to get the length I wanted.  Press all sides of the tie over roughly a 1/4 of an inch.


Pin your tie to the top of the apron.  Open the 1/4 of an inch seam you pressed, line the outer edge of the tie up with the top of the fabric. 


Sew along the seam line you created from one end of the apron to the other end of the apron.  Take the apron off of the sewing machine.  Fold the tie up, along the 1/4 of an inch you just sewed along, and then fold the rest of the tie, in half over the top of the apron.  Sew the tie into place using a top stitch (basically sew as closely to the bottom of the tie as you can).


Continue top stitching down the length of your tie, across the end of the tie, across the top of the tie, down the opposite side and back to the front of the apron, where you began.


Now go do some imaginary or real baking in style.


First shared with One Artsy Mama.
Related Posts Plugin for WordPress, Blogger...