


When I got the Easter themed Pottery Barn for Kids catalog, I feel in love with their Bunny Basket.

{image via Pottery Barn for Kids}
I tore the page out and stared it for a few days, thinking to myself, I wonder if I could make this myself. I should preface this by saying, I am a relatively novice sewer {I may excel at making fake felt food but that isn't what I would call technical sewing}. I had no pattern so I just figured it out as I went along. There were many bumps in the road, as you might expect. My seam ripper got pushed to its limits but, in the end, I am happy I tried and, dare I say, succeeded.
If you have any technical skills, I welcome any feedback for tips that might make the steps I took easier for anyone else willing to try it themselves.
If you are still reading, bless you and here's the tutorial:
Supplies:
1/2 yard of white material
1/2 yard for the inside {this is more than you'll need}
1/4 yard of material for the ears
1/2 yard of batting
1/2 yard of light-weight, fusible, woven interfacing {I used Pellon brand}
Embroidery thread & scrap fabric {for the face} OR you could always use some glue and felt
Seam ripper :)
Pattern, you can download the body and the ear pattern or email me whilewearingheels @ gmail dot com (remove spaces) and I'll email you the pattern.
Ear Construction:
1. Layering your ear white material and pink material, place right sides together. Sandwich the batting between the layers.
2. Using 1/4 of inch seam allowance sew the ears shut, leaving the bottom unsewn.
3. Turn the ear right side out.
4. Pinch the bottom of the ear over and sew across.
* Repeat these steps for the second ear.

*You may notice, my finished ears are a different color, the seam ripper got these.
1. Cut a 20 x 3 1/12 strip of fabric for your handle and batting.
2. Fold it in half. The handle fabric on the inside, batting wrapped around on the outside.
3. Using a 1/4 of an inch seam allowance, sew along the open edge.
4. Turn it right side out.
5. Optional: Top stitch 1/4 of an inch in on each side of the handle. This gives it a more finished look.

Outer Body Construction:
*fuse the interfacing to the wrong side of the white fabric before cutting out the body. This should help give your basket more structure. Remove paper backing from interfacing and follow the rest of the steps.
1. Layer the batting and outside fabric together.
2. Using a 1/4 inch seam allowance, sew one side of paneling to the next side {each panel will be layered with a batting panel}. Continue sewing each side together until all 5 sides are sewn together.
3. Turn it right side out.
*Not shown. When I turned my bunny right side out, in the center of the bottom, I still had a little opening. I ended up sewing a circle patch over this area, to cover my hole and give a more finished look.
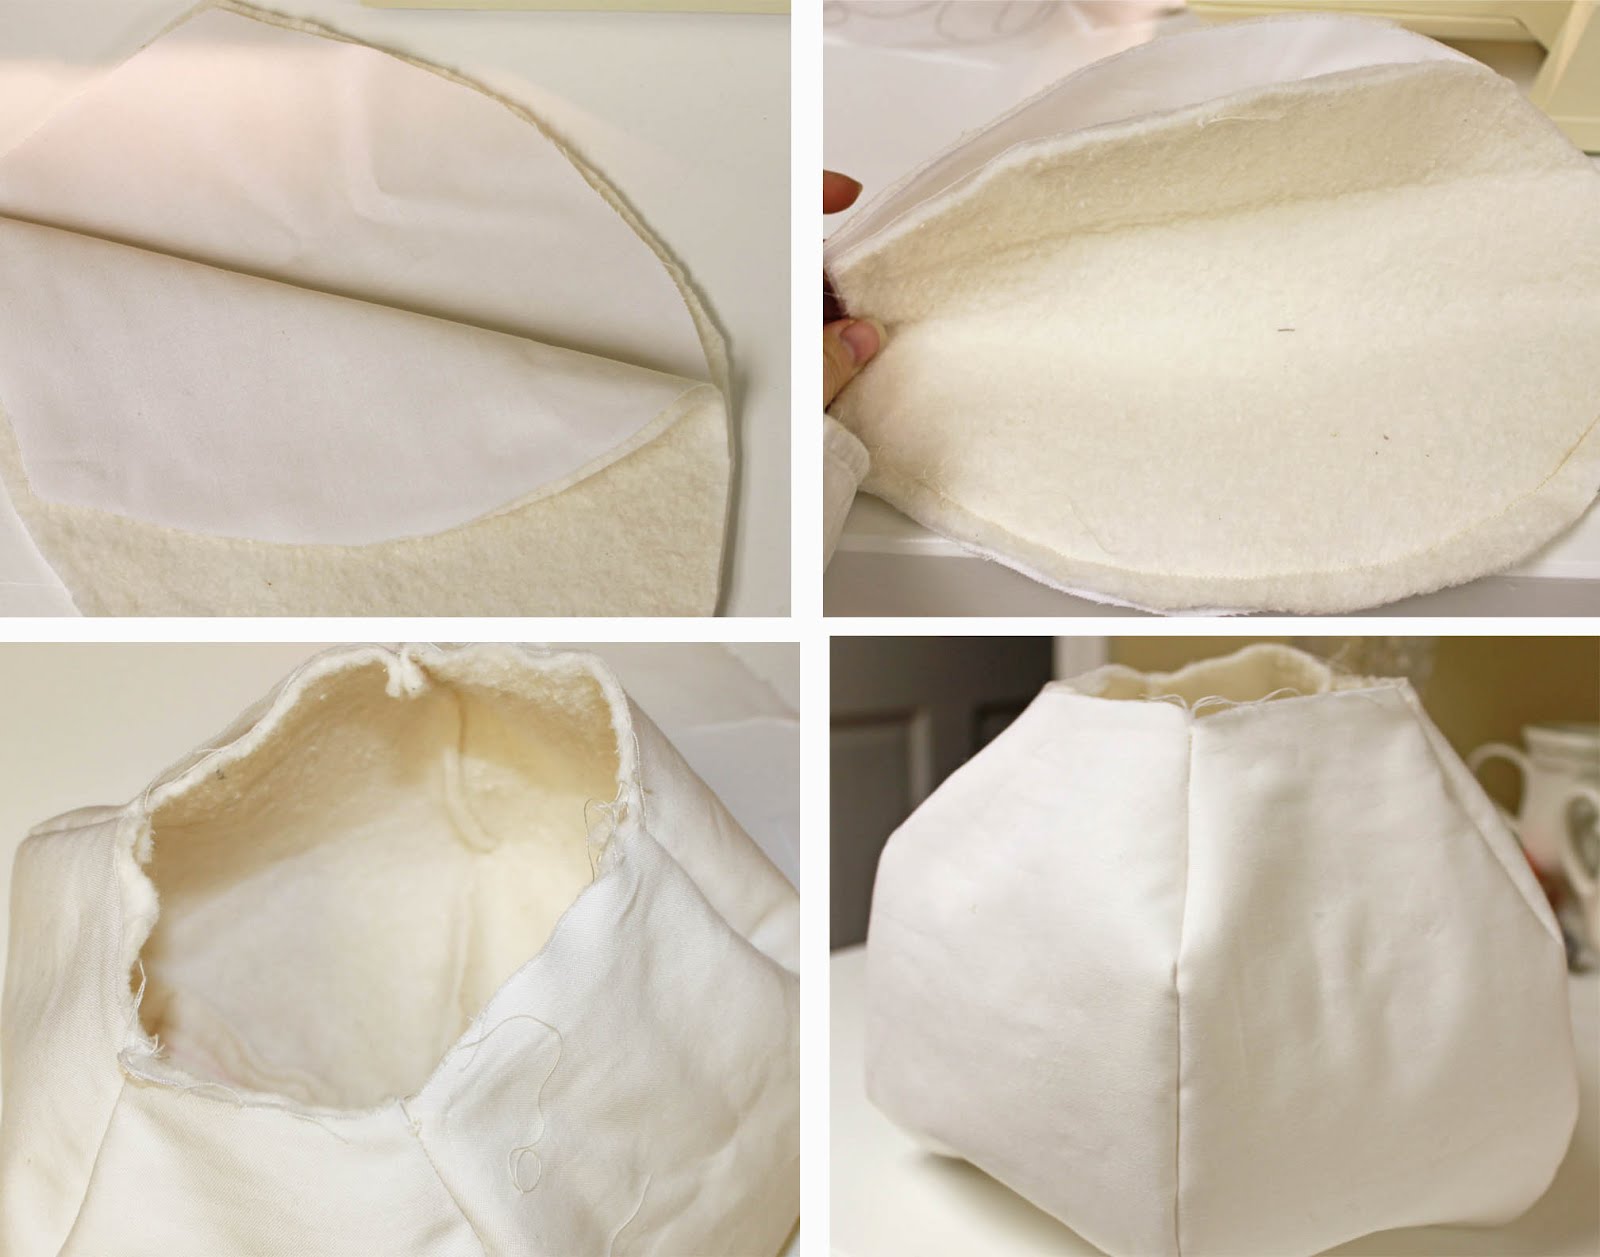
Inside Body Construction:
1. Using a 1/4 inch seam allowance gradually moving towards a 1/2 seam allowance, sew one panel to the next {right sides facing each other}. Continue sewing until all panels are sewn together.
2. Trim along the seam lines, removing the raw edge excess.
3. You do NOT need to turn it right side out {though, out of habit I kept trying to}.
4. Stuff it into the outer body to see how well it fits.

Face Embellishments:
You have complete creative license to finish your bunny face in whatever way you please. My only real tip, pin your ears on, so you can figure out how you want the face to look, in reference to where the ears are.
I used a water solvable pen to draw out my bunny's face. I used dark brown embroidery thread and straight stitched her eyes. I appliqued on a fabric nose and then embroidered a line beneath her nose, along the seam line, for her mouth.

Sewing the Inside to the Outside:
1. Pin your ears down and your handle on {you may need to adjust needle placement when you line up the inside fabric to the outside fabric, to avoid breaking a needle when you begin sewing}.
2. If you are a veteran sewer, place the outside of your bunny into the inside section of your basket {right sides facing together. Sew around the the bunny, leaving about a 3 inch section unsewn towards the back of the bunny.
* If you are a novice sewer, like this girl, I did not insert the bunny into the inside section. I opted to pin the first 2 sections of the outside to the inside, covering the face of the bunny. I did this 1. assure my ears were properly sewn into place and 2. to give me the confidence that I was attaching the lining correctly. After I sewed these 2 sections to the inside of the basket, I turned it right side out to check on my progress. For the remaining sections, I stuffed the outside of my bunny back into the inside of my bunny and sewed the remaining 2 panels closed.
3. Turn the bunny right side out through the opening you left unsewn.
 |
| You can see the patch I sewed in the 1st picture, to cover my hole and seams {referenced in outer body construction}. |

Cute, right?

The only thing missing, a fuzzy little tail. Thank goodness for Goodwill. I found a Santa hat for .49 cents {today}.

Heck yeah...I cut that pom pom off and sewed it to my basket.

Tada...

Some bunny already loves this.

*If you should attempt to make this bunny, best of luck. I did try to explain, as best I could, the process I used. Again, I am not a technical sewer. So, if you are a novice sewer like me, don't let any project intimidate you, grab your seam ripper, know it's OK to make a mistake and remember sometimes things are even more beautiful flawed.
©2011. For personal use only. Please do not use this tutorial for distribution or resale purposes. You are welcome to link back to this site. All borrowed content must be given proper credit. This is the intellectual property of While Wearing Heels.

