Thursday, January 31, 2013

Groundhog Day

Did you know, Groundhog Day is this weekend.  February 2nd, to be exact.

{Image via The Washington Post}

Will Punxsutawney Phil see his shadow bringing 6 more weeks of winter?

Grace and I were inspired to make our own groundhog, a shadow painting groundhog to be exact.

We did a quick google search for groundhog silhouettes. It made me sad that one of the only decent silhouettes I found had a target on its belly.


We cut our groundhog out of a thick advertisement piece and glued him {very lightly} to some brown card stock. With a sponge and some white paint, we dabbed him lightly around his perimeter.


When his shadow dried, we carefully lifted up our groundhog pattern and admired his shadow.


This groundhog saw his shadow, you'll have to wait until Saturday to see if Punxsutawney Phil does too.

Happy early Groundhog Day.

Wednesday, January 30, 2013

Fragile Hearts Made of Clay

A clay dough recipe for the fragile hearted.


The recipe, a cup of baking soda, 3/4 cup of water, 1/2 cup of corn starch.  Mix the ingredients in a sauce pan, over medium low heat, stirring until it's the consistency of mashed potatoes.  *For a more detailed tutorial, go check out The Woodside Kitchen.

When the dough has cooled, roll them out and have fun creating different shapes using cookie cutters.


Then, get creative making some imprints with rubber stamps.


Fragile hearts seemed poetic.


Bake the ornaments for roughly 1 hour at 175 degrees.  Once cooled, hang and decorate.


A wonderful reminder that the heart and love are both fragile and to be handled with care. 


Though I love my fragile heart, to take a page from Mellywood's Mansion, I desperately wanted this to be a delight BUT the more my ornaments dried out, the more *fragile* they started to look.  Of the 13 ornaments I made, only 1 was worth saving.  All were cracked and some cracks even went clear through to the back of the ornament.


 Help me turn this disaster into a delight...where did I go wrong?

Tuesday, January 29, 2013

Valentine's Day Cards for the Love Sick

The only thing better than candy, in our house, is Band-aids.  SO when it came time to decide what kind of Valentine's Grace would give out, taking into consideration all the food allergies and sugar adverse moms from her preschool class, Band-Aids seemed like a fun alternative to candy.


The only challenge, was deciding on what kind of card she would give out along with her Band-Aids.  Thank goodness for PicMonkey because I was able to create my own.


The only thing left to do, pick out some Band-Aids...


and have the *doctor* sign her prescriptions.


Valentine day cards that are perfect for the love sick...


or Band-Aid lover in your life.


Monday, January 28, 2013

Angel Wing Tee Shirt

Every mother wants to believe that their child...


is an angel,


despite any devilish looks they might give.


So, when I came across a tutorial for an angel wing shirt, from Simple Simon & Co, I knew I had to make one for my little angel.  The only adaption I made, I embroidered 'angel' on the front pocket...


so there would be no doubt that this little girl...


is an angel.


Love is all you need.


And a pair of angel wings will remind everyone that you truly are an angel, even when you are feeling a little devilish.

*For the full tutorial, please go check out Simple Simon & Co and while you are there, take a look around, she has some fantastic ideas.

Friday, January 25, 2013

This Is ME - January Self Portrait Party

I am so excited for our first *This is ME* self portrait linky party today!  January's theme was 'simple moments'.

My simple moment from the past month, working out with Grace.  Grace loves sitting with me, while I work out, it was one of those simple moments in life I wanted to capture to remember.


This is a perfect example of how a self portrait doesn't have to show your face.  A self portrait by definition has to be taken by you and have part of you {even if it's just your hand or your feet} in the picture.

Though many of your expressed some hesitation about joining the challenge.  I hope you'll be brave and get in front of the camera and preserve some memories, you never know what these pictures will one day mean to someone else.

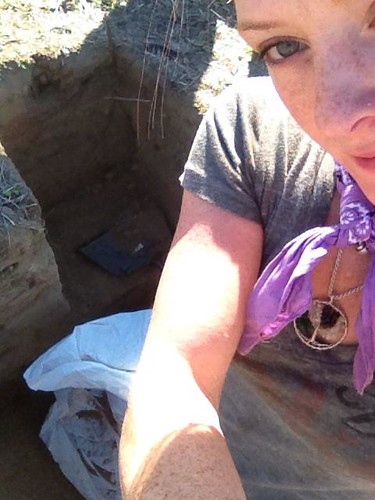
A big thanks to Kayla for the being the first one to show off her self portrait.  Here she is on an archeological dig, excavating a site in San Diego.  Seriously, what a cool job and great self portrait.

601086_563693662283_2124095261_n

So, now is your turn.  Come out from behind the camera, capture a simple moment and inspire us all.

While Wearing Heels


Let's get this party started...here are our linky rules:
  • There will be a link up here on the last Friday of every month this year, and the linky tool will remain open to your submissions until the last Friday of the next month.
  • Please link back to the permalink for your *This Is ME* blog post or flickr image, not just the general url for your blog or flickr stream.
  • Linked entries must be to a blog post or flickr image of your recent self-portraits, not just any old photo. Your photo does not have to relate to the optional monthly theme, but it does need to be a self-portrait.
  • Please do link back here to my blog either through a text link, or with my button found below to help encourage others to participate and grow our community.
  • And most importantly, be the encouragement you hope to receive and help build our self-portrait community! Please try to visit a few of the links of your fellow *This Is ME* participants and leave a nice comment--it only takes a few minutes and you may be inspired by what you see.
Well, that's it...now get linking everyone! I'll see you back here on Friday, February 1st, for our February theme announcement, and in the meantime, keep showing us your stuff in the flickr pool.


*If you are new to link parties, here's how it works:

Click on 'click here to enter'
A new window will open up with 4 blank fields to fill out.
1. URL *Enter the url to your blog post, from your flickr account or from the group flickr page for This Is ME
2. Caption or Title *Enter either your name or what you want your self portrait to be titled.
3. EMAIL *Enter your email address.  This will not be seen by anyone publicly.
    Name *Enter your name.  This will not be seen by anyone publicly.
4. Crop Image
   From Web *defaults to the URL you entered in step 1
   From File * defaults to your computer 
   From generic * will populate picture with a generic thumbnail.   

A new screen will open up, filling with pictures from the URL location you entered.  Select the picture you want to link up.
You will be prompted to crop your picture.

Click to return to blog

Now you've linked up and you can go visit the other brave people who have decided to share their self portraits.  

Thursday, January 24, 2013

LOVED Tee Shirt

With a plain red tee shirt on hand and Valentine's day rapidly approaching, I decided to make Grace a LOVED shirt.


To make your own LOVED tee shirt, get yourself:
a tee shirt
embroidery thread or use 2 strands of DMC thread {I used DMC white}
needle
embroidery hoop
water erasable fabric marking pen

On paper, I wrote out LOVED to figure out the spacing. Then, I folded the tee shirt and determined roughly where the center was and where I would place the lettering. I free handed and drew LOVED onto the tee shirt with a water solvable pen.


The nice thing with the water solvable pen, any perfectionist tendencies you have, if at first you aren't happy, apply some water {let it dry} and then try again.


Embroider the letters using a stain stitch. This basically means, work each stitch smoothly from one side of the letter to the other side of the letter. Lay each stitch as close together as possible (without pulling too tightly). The goal is that no fabric will show through between each satin stitch.


When you are done, use some water to dissolve any exposed lines. And admire!


Yes, Grace is definitely LOVED...


even when she gives me that sassy look.


I hope you've been inspired and feel loved.

Wednesday, January 23, 2013

Another Stamp Made With Love

Last year, I made some mustache stamps out of school erasers.


This year, I made LOVE stamps.  Who couldn't use more love?


Using a school eraser and an x-acto knife I was able to make another customized stamp.


The only thing I didn't take into consideration...


When using letters or numbers to make a customize stamp, you'll need to carve the mirrored image into your stamp.


Another stamp, made with love.

Tuesday, January 22, 2013

Felt Hearts Headband & Garland


My love affair with felt continues.  This time, instead of being in the form of fake food, it's in the form of hearts.


Heart head bands first and heart garland to follow.


To make a heart head band, grab a few felt hearts and some fold over elastic.


Then line the hearts up on top of the fold over elastic


Sewing


Sew the ends of the fold over elastic together and you have a quick and easy Valentine's day accessory.


With the rest of my hearts, I made 'the easiest heart garland' from Made by Rae


And easy is an understatement.  This is the perfect sewing project for first time sewers.  You don't even need to make sure your lines are straight, as long as they connect one heart to the other, you've succeeded.


Heart head band and heart garland...though, if you ask Grace, she'll tell you the garland is her beautiful scarf. 


Related Posts Plugin for WordPress, Blogger...