Showing posts with label no sew. Show all posts

Monday, December 16, 2013

Embroidery Hoop Reindeer Family

You know Dancer and Prancer and Comet and Cupid...but do you recall the most famous reindeer family of all? 


The most famous reindeer family of all was started by, Vixen, of course.


With rosy cheeks, she waits under the mistletoe batting her eyelashes.


*All reindeer are no-sew.  So, grab some glue, felt, embroidery hoops and material.  Add embroidered embellishments if it suits you.

To make your own Vixen, use the pattern below and customize to suit your own personality. 


 Vixen waits for her Bing Crosby Deer.


Dressed in his festive holiday tie, an ornament hangs from his antler as he smokes his pipe.


To make your own Bing Crosby Deer, use the pattern below. 


Vixen and Bing have a sweet little girl, their baby deer.


Still in her holiday dress, she grows weary waiting for Santa to arrive and deliver presents.


To make your own baby deer, use the pattern below and customize to suit your own personality.


From me and those deer to me...we wish you the happiest of holidays.


If you liked this deer family, be sure to check out how to make a custom felt bunny family.

Monday, December 9, 2013

Merry Christmas Banner

Because Christmas is just a little more special with handmade decorations, I decided to make a merry and bright Christmas banner...out of felt.  Christmas and felt.  There isn't anything much better than that.


This inexpensive handmade Merry Christmas garland can be customized with the colors you select and/or the holiday saying you want to create. 

So, go grab some felt and let's get start.  I opted to go bright and cheery as opposed to traditional.  Make this garland your own and select colors that make you happy.


Using a water soluble pen, trace your letters.  Each letter will be layered so you'll need to cut out 2 of every letter.


Using a running stitch (or a sewing machine, to save yourself time), sew around each letter.  Leave roughly 1/2 an inch unsewn on each side of your letter.


By leaving this section of every letter unsewn, you will be able to string twine or ribbon through it and adjust your letters later, based on where you decide to hang it. 


Finish stringing your letters...


Find a place to display...


And, enjoy!

Merry Christmas!

Friday, December 6, 2013

Sweater Star Christmas Tree Topper Tutorial

A little girl had her dreams come true. The wonder of Christmas, in Christmas tree glory, got set up in her own room this year. 


The only thing missing...a star for the top of her tree.

This little Christmas tree is filled with handmade ornaments so it seemed only fitting the tree be topped with something handmade as well.  With a box of Grace's outgrown clothes on hand, I decided to make star for the top of her tree out of an old sweater.


Believe it or not, it was easy to make and required absolutely NO sewing.

To make your own sweater star, find yourself an outgrown sweater, some cardboard and hot glue.

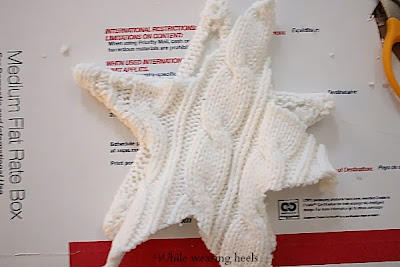
Get started by tracing a star onto sturdy cardboard and then cut it out.


Place the cardboard star onto an old sweater.  Again, I used one of Grace's outgrown sweaters...I think it makes this handmade star even more meaningful. 

Using a water soluble pen, trace around the cardboard star.


Cut your star out, leaving an excess of about 1/4th of an inch around the line you traced.  I cut through the front and back of the sweater at the same time.


Place the cardboard star over one section of sweater you just cut into the star shape.  Wrap the tips of the star over the cardboard and hot glue them all into place.

When the points have been glued into place, apply hot glue down the length of the stars.  Fold the sweater sides over and glue into place.  


To finish, using hot glue, glue the second section of sweater to the front of the star.  *I worked one side at a time, tucking the sweater under to create a faux seam.  Basically, you want the raw edge of the remaining star, folded under and then glued into place, sandwiching it between the bottom layer.


Leave the center bottom of your star unglued.  Through this opening, you will be able to secure place the star on top of your Christmas tree.


Once a sweater...


 Now a Christmas tree topper...with a little more meaning.

Wednesday, April 10, 2013

Superhero Mask

As most of you already know, I love felt. SO, when I saw a no sew Superhero mask tutorail from Kinderpendent, I knew I had to try it.


Not only was it easy but look at how cute...er, I mean, heroic they look.


*Don't worry, I don't have 2 more kids that I've been keeping secret from you...the boys are my nephews.
Related Posts Plugin for WordPress, Blogger...