Showing posts with label no sew projects. Show all posts

Monday, October 7, 2013

Sew and No-Sew Handkerchief Garland Tutorial

After you've dried your tears and wiped your nose, you might be wondering what you could do with your collection of hankies.

Why not turn those handkerchiefs into a garland?  I've got both a no-sew and sew option...so keep on reading.


Don't have a collection of hankies?  Flea markets, Etsy and ebay are great places to hunt for them.  They typically run between $1-$4 per handkerchief.


Since the likelihood is great that the hankies were indeed used to dry tears and wipe noses, I start by washing them in a gentle cycle.  After they've been washed, I iron the handkerchiefs, folded into a triangle across the bias, and apply starch to give the delicate hankies some structure.


First up, the sew version.  *Keep reading for the no-sew version.

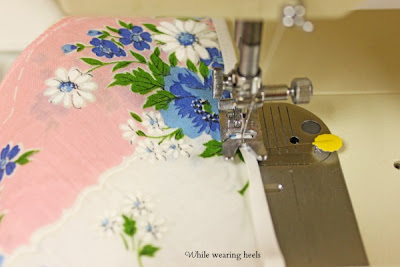
Grab some double biased tape.  Open the double biased tape and nestle the long folded section of the handkerchief in between, pinning it into place. 


Continue pinning each hankie into place.  I lined my hankies up so where one ended the next one began.


Head to your sewing machine. Doing either a straight stitch or zigzag, sew the handkerchiefs into place.


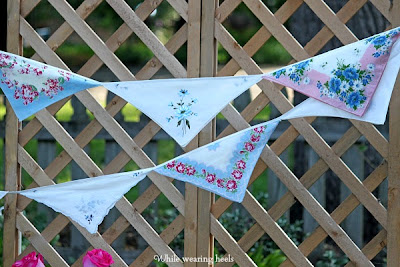
When you are done, find someplace to hang them up...


And, enjoy.


Like the look but don't like to sew?

I've got a no-sew version for you as well.
 

Fold your handkerchiefs up and pin them into place on either twine or the bias tape with clothespins.

 
No sewing required.


Don't have handkerchiefs?  No problem.

You can also use some bandanas.  


Another no sew option, just place the bandanas over the twine or bias tape.


Sew or no-sew, this hankie garland is easy enough that it should case any tears.

Of course, if it does, you can always dry your tears or wipe your nose with one of your hankies :)


Originally shared with:

Monday, March 11, 2013

Make A Custom Felt Bunny Family

Turn the members of your family into bunnies by creating your own custom felt bunny family.

Not only is this an easy, no sew, fun project, BUT it also has the possibility of becoming a family hareloom.


To make your own personalized bunny family, gather the following supplies: 


The number of embroidery hoops and spring colored fabric will depend on how many bunnies you need for your family.

Cover each embroidery hoop with desired colored fabric.  Trim excess away.


Next, cut out the bunny body parts.

Out of the white felt, cut a round circle {bunny head}, 2 ears and a rounded triangle body.  Out of the pink felt, cut out a cute little bunny nose.


Create your bunny by gluing the bunny parts onto the fabric covered embroidery hoop.  The bunny eyes, French knots, are made using black thread.  *You can add any extras {buttons, beads, felt} to help personalize each bunny.


Repeat these steps for each bunny family member you have left.

Now to formally introduce you to the While Wearing Heels bunny family.


Thank goodness Mommy Bunny was having a good hare day.

Moving on to Daddy bunny, who won mommy bunny over with a 24 carrot ring.


And, last but certainly not least, Baby Bunny.  Baby Bunny enjoys spending her day playing hopscotch.


A truly EARresistable bunny family.


So, I am all *ears*, tell me how you'd personalize your own bunny.

Link Party Websites


{T} *From Dream to Reality Link Party ** Thursday Linky Party at Osie Moats * A to Zebra Celebrations Link Party Tuesdays* Be Inspired by Elizabeth and Co.   * Tutorials and Tips on Home Stories A 2 Z   * I gotta try that   * Off The Hook Link Party  * Delicate Construction * The Winthrop Chronicles  * Open Call Tuesdays on Salt Tree * Adventures of a DIY MOM * Take a look Tuesday at Sugar Bee Crafts * Blackberry Vine Tuesday To Do Party Coastal Charm * My Uncommon Slice Of Suburbia  * Tip Junkie   

{W}*Riverton Housewives Round Up *In Bloom Link Party *Adorned from Above * All Star Blogging Party *Well Crafted Wednesdays *What I Whipped Up Wednesdays * Homemade by You Wednesday * Whimsy Wednesdays  * Blue Cricket Design  * The Fun In Functional * What I learned Wednesday *   Home Happy Home * Someday crafts 

{TH} Delightful OrderA Glimpse Inside  *  The Crafty Blogstalker * Made In a Day A Little Knick Knack * House of Hepworth's  * 52 Mantels *
 

Thursday, November 8, 2012

Pottery Barn for Kids Knockoff Advent Calendar

While grocery shopping today, Grace noticed that there were Christmas decorations out.  Then, she so astutely pointed out, but it's not even Christmas.

 
Ah, yes.  The world of retail and blogging are very much the same.

Thank goodness Grace doesn't read my blog because it's about to get a little Christmas-y around here as well...and yes, I know, it's not even Christmas yet. 

First up, my knock off version of Pottery Barn for Kids advent calendar.


It is 90% no sew AND the sewing that is required {attaching the pockets to the tree} can all be done by hand.

Since it's no sew, you can even get the kids involved.  You can use the patterns I provided


OR you can create your own designs.

Either way, since it's not even Christmas yet, you have plenty of time to make one of your own.

You can find the tutorial along with 25 patterns for each pocket here:

Advent Calendar Part 1
Advent Calendar Part 2
Advent Calendar Part 3
Advent Calendar Part 4


And be sure to check out my other Christmas inspired posts:

DIY Pottery Barn Candle
DIY Star Wars Ornaments
DIY Santa Beard


Tuesday, April 10, 2012

Superhero Masks

As most of you already know, I love felt. SO, when I saw a no sew Superhero mask tutorail from Kinderpendent, I knew I had to try it.


Not only was it easy but look at how cute...er, I mean, heroic they look.


*Don't worry, I don't have 2 more kids that I've been keeping secret from you...the boys are my nephews.

Monday, November 7, 2011

The little black tee shirt

Now that the sheepie costume is behind us...


I decided to use the plain long sleeve black tee shirt, from under the sheepie fluff, and get crafty with it.


We've never really dressed Grace in black, probably because for her first year or two of life, she had very little hair, and even though we dressed her in pink, she was often confused for a boy. So this shirt definitely needed a little feminine touch, cue some pink fabric with black polka dots


AND some Heat N Bond Ultra Hold which is no sew!


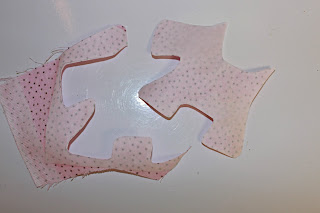
I drew out a simple silhouette of a dog and then traced it onto the Heat n Bond. {I could totally see using a car or a rocket ship silhouette for a little boy's tee shirt and embellishing with a button or two.}


Iron your designed Heat n Bond onto the fabric.

I used to cut the exact design out of the heat and bond and then iron it onto my fabric BUT the queen of quilts suggested cutting the exact design out after the heat and bond is ironed onto the fabric. Brilliant. It makes it so much easier to cut your design out with the extra Heat n Bond.


Peel the back of the Heat n Bond off.


Decide where to place the design and iron it down. Learn from my mistakes, put a protective barrier between what you are ironing on and your iron.


As easy as that, the dog is attached. Cute but I still wanted to add a little more flare.


To the button jar I went. I just so happened to have another cute flower button. Then, I embroidered a black collar. This doggie is a kept doggie, she belongs to Grace.


I am happy with the outcome.

And that's how you turn a sheepie into a pink polka dot doggie.

Related Posts Plugin for WordPress, Blogger...