


When I got the Easter themed Pottery Barn for Kids catalog, I feel in love with their Bunny Basket.

{image via Pottery Barn for Kids}
I tore the page out and stared it for a few days, thinking to myself, I wonder if I could make this myself. I should preface this by saying, I am a relatively novice sewer {I may excel at making fake felt food but that isn't what I would call technical sewing}. I had no pattern so I just figured it out as I went along. There were many bumps in the road, as you might expect. My seam ripper got pushed to its limits but, in the end, I am happy I tried and, dare I say, succeeded.
If you have any technical skills, I welcome any feedback for tips that might make the steps I took easier for anyone else willing to try it themselves.
If you are still reading, bless you and here's the tutorial:
Supplies:
1/2 yard of white material
1/2 yard for the inside {this is more than you'll need}
1/4 yard of material for the ears
1/2 yard of batting
1/2 yard of light-weight, fusible, woven interfacing {I used Pellon brand}
Embroidery thread & scrap fabric {for the face} OR you could always use some glue and felt
Seam ripper :)
Pattern, you can download the body and the ear pattern or email me whilewearingheels @ gmail dot com (remove spaces) and I'll email you the pattern.
Ear Construction:
1. Layering your ear white material and pink material, place right sides together. Sandwich the batting between the layers.
2. Using 1/4 of inch seam allowance sew the ears shut, leaving the bottom unsewn.
3. Turn the ear right side out.
4. Pinch the bottom of the ear over and sew across.
* Repeat these steps for the second ear.

*You may notice, my finished ears are a different color, the seam ripper got these.
1. Cut a 20 x 3 1/12 strip of fabric for your handle and batting.
2. Fold it in half. The handle fabric on the inside, batting wrapped around on the outside.
3. Using a 1/4 of an inch seam allowance, sew along the open edge.
4. Turn it right side out.
5. Optional: Top stitch 1/4 of an inch in on each side of the handle. This gives it a more finished look.

Outer Body Construction:
*fuse the interfacing to the wrong side of the white fabric before cutting out the body. This should help give your basket more structure. Remove paper backing from interfacing and follow the rest of the steps.
1. Layer the batting and outside fabric together.
2. Using a 1/4 inch seam allowance, sew one side of paneling to the next side {each panel will be layered with a batting panel}. Continue sewing each side together until all 5 sides are sewn together.
3. Turn it right side out.
*Not shown. When I turned my bunny right side out, in the center of the bottom, I still had a little opening. I ended up sewing a circle patch over this area, to cover my hole and give a more finished look.
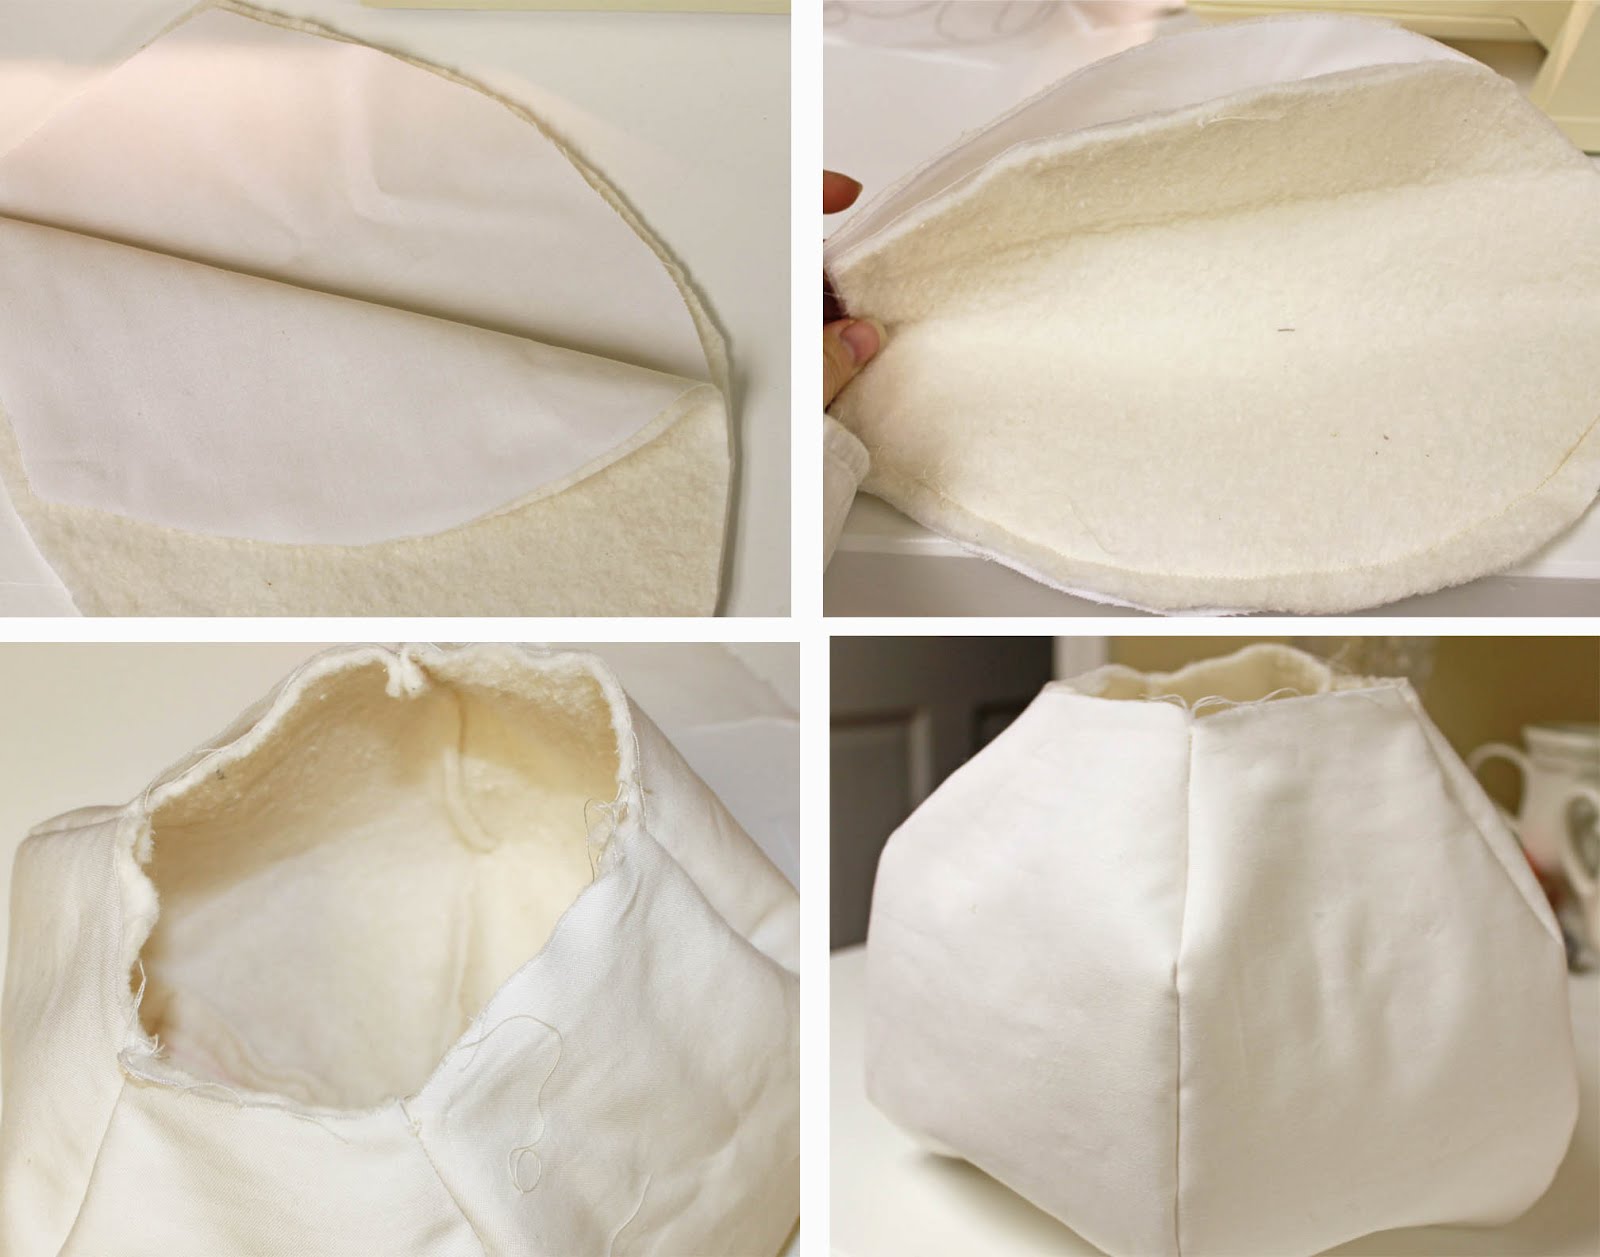
Inside Body Construction:
1. Using a 1/4 inch seam allowance gradually moving towards a 1/2 seam allowance, sew one panel to the next {right sides facing each other}. Continue sewing until all panels are sewn together.
2. Trim along the seam lines, removing the raw edge excess.
3. You do NOT need to turn it right side out {though, out of habit I kept trying to}.
4. Stuff it into the outer body to see how well it fits.

Face Embellishments:
You have complete creative license to finish your bunny face in whatever way you please. My only real tip, pin your ears on, so you can figure out how you want the face to look, in reference to where the ears are.
I used a water solvable pen to draw out my bunny's face. I used dark brown embroidery thread and straight stitched her eyes. I appliqued on a fabric nose and then embroidered a line beneath her nose, along the seam line, for her mouth.

Sewing the Inside to the Outside:
1. Pin your ears down and your handle on {you may need to adjust needle placement when you line up the inside fabric to the outside fabric, to avoid breaking a needle when you begin sewing}.
2. If you are a veteran sewer, place the outside of your bunny into the inside section of your basket {right sides facing together. Sew around the the bunny, leaving about a 3 inch section unsewn towards the back of the bunny.
* If you are a novice sewer, like this girl, I did not insert the bunny into the inside section. I opted to pin the first 2 sections of the outside to the inside, covering the face of the bunny. I did this 1. assure my ears were properly sewn into place and 2. to give me the confidence that I was attaching the lining correctly. After I sewed these 2 sections to the inside of the basket, I turned it right side out to check on my progress. For the remaining sections, I stuffed the outside of my bunny back into the inside of my bunny and sewed the remaining 2 panels closed.
3. Turn the bunny right side out through the opening you left unsewn.
 |
| You can see the patch I sewed in the 1st picture, to cover my hole and seams {referenced in outer body construction}. |

Cute, right?

The only thing missing, a fuzzy little tail. Thank goodness for Goodwill. I found a Santa hat for .49 cents {today}.

Heck yeah...I cut that pom pom off and sewed it to my basket.

Tada...

Some bunny already loves this.

*If you should attempt to make this bunny, best of luck. I did try to explain, as best I could, the process I used. Again, I am not a technical sewer. So, if you are a novice sewer like me, don't let any project intimidate you, grab your seam ripper, know it's OK to make a mistake and remember sometimes things are even more beautiful flawed.
©2011. For personal use only. Please do not use this tutorial for distribution or resale purposes. You are welcome to link back to this site. All borrowed content must be given proper credit. This is the intellectual property of While Wearing Heels.

OMG you did an AWESOME job! I wouldn't have been able to figure out the steps without a pattern! Thanks for the tutorial! Maybe I should try taking a jab at making one:D
ReplyDeleteMaysem, THANK YOU! If you do make one, be prepared, you may need to tweak a few things as you go. Best of luck!!!
DeleteSuper cute Amy!!!!!!!! Definitely not a novice sewer anymore.
ReplyDeleteYou are so sweet. Thanks Kim!
DeleteVery very cute. Perfect for the easter bunny. Thanks again for joining in. Enjoy the party.
ReplyDeleteThanks for taking time to personally check out my bunny basket. Loving your copy cat challenge!
DeleteThis is too cute!!! Thank you for sharing.
ReplyDeleteThanks for starting my morning out with a smile Annie!
DeleteShut the front door, Amy!!!!!! This basket is so adorable!! What a great knock-off!!!! I like yours much better than the PB version. Great idea you had to do it yourself. I bet your 'bunny' really loves it:) Thanks for mentioning me as your cheerleader in this post! Really appreciate it! Have a great day! Heather @ settingforfour.blogspot.com
ReplyDeleteHeather, thanks for your feedback and for encouraging me to post it!
DeleteThat's so cute! You did a great job :) I'm a new follower and would love for you to stop by my brand new blog and follow, too :)
ReplyDeleteThanks for your feedback Kristin and I happily returned the favor and became your newest follower as well!
DeleteOh that is so cute!!! I love it! Thanks for sharing at Thursday's Temptation.
ReplyDeleteJill
Aw...thanks Jill. I'll definitely have be linking up more at your adorable blog.
DeleteAdorable and a great tutorial!
ReplyDeleteThank you so much for taking the time to leave a comment, you made my day!
DeleteThis turned out great - I've had making a bunny basket on my list of to-dos for a while and yours is adorable. Thanks for linking to Craftastic Monday!
ReplyDeleteIt means a lot that you took the time to stop over and check out my tutorial. It was my pleasure to link up!
DeleteOh my goodness - this is fabulous!! Great work - I'm pinning this tutorial!
ReplyDeleteThanks for linking to a Round Tuit!
Hope you have a fabulous week!
Jill @ Creating my way to Success
http://www.jembellish.blogspot.com/
Jill, I am always flattered when the host of a party stops over. Thanks for taking the time to comment and for pinning my tutorial. You just made my night!
DeleteThis bunny is sew very cute! I would make one if my kids actually needed it, or maybe I will attempt the chick bc I have a weakness for chicks! :)
ReplyDeleteThanks Wendy. My daughter actually requested the chick but I didn't think I could figure that one out. Best of luck!
DeleteFantastic! Adorable!
ReplyDeleteAw...thanks!
DeleteI like the bunny!
ReplyDeleteThis is great! I really want to pin this, but Pinterest keeps giving me an error message (something about no height/width set for images and an infinite loop...blah, blah, blah) so I guess I'll have to bookmark this the old fashion way! Thanks for the tutorial!
ReplyDeleteThanks Trina. You made my morning.
DeleteNovice sewist?? OMG..you did a fabulous job! I can hardly wait to try it. Also you can wrap yarn around a fork, tie it and cut the yarn between and poof, you have a tail for the bunny! :) Have a great day!
ReplyDeleteHere's a tutorial for the cotton tail!
http://eclecticallyvintage.com/2013/01/how-to-make-a-pom-pom-flower-bouquet-with-a-fork/
I absolutely love it! Great job! You are more talented than you believe yourself to be! Your sewing skills amaze me..but a novice you definitely are not!
ReplyDeleteSo so cute, Amy! I love it. :)
ReplyDeleteJust LOVE IT!!! I only have those cheep Walmart baskets for my 2 youngest & totally gunna give it a shot! Thinkin I will just change the color on em & booya baskets I actually want in pics!! Tysm!!!
ReplyDeleteThank you so much! Let me know if you have any bumps in the road.
DeleteHi! Thanks for sharing this tutorial with the world! I just wanted to give you a head's up that I'll be linking to it from my blog (http://sewlindsaysew.wordpress.com) in a post about my ten favorite Easter-inspired projects! Happy Sewing!
ReplyDeleteThis is so adorable! Love it! Love for you to share it at our Easter Round up! :) Marti
ReplyDeletehow to cancel avast automatic renewal
ReplyDeletecanon support code 5b00
Love it!
ReplyDeleteTJC Group offers advanced data archiving services that help organizations manage large SAP databases efficiently. Their SAP data archiving solutions enable businesses to securely archive historical data while keeping it accessible for compliance, audits, and reporting. This helps improve system performance, reduce storage costs, and prepare SAP environments for future upgrades.
ReplyDelete