Friday, September 30, 2011

I heart fake food - Lemon Tutorial

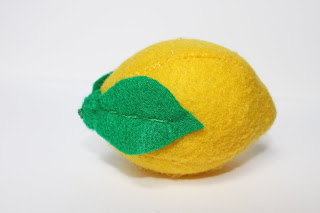
When life gives you yellow felt, make lemons!


Supplies:Yellow and Green Felt
Fiber fill
Green thread and needle
Pattern (you can enlarge the picture below or download it here)


Using the pattern provided, cut the body of the lemon out of yellow felt and the stem/leaves of the lemon out of green felt.


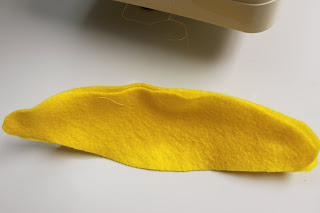
Start by arranging 2 pieces of the lemon body together. Using a sewing machine, sew down one side of the pieces you have arranged together. Make sure to leave ¼ of an inch open from the top.


It will look like this...


Continue arranging the pieces of lemon body together, sewing each new side together. Conclude by sewing the last sides together, closing the lemon {leaving a 1/4 of an inch open at the top of the lemon}.


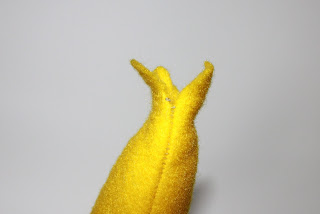
When all sides have been sewn together...


carefully pull the bottom of the lemon through 1/4 inch opening, turning your lemon right side out.


Generously stuff your lemon with fiberfill.


Grab your stem/leaves, the sewn and stuffed body of the lemon and green thread and needle.


Using the green thread, sew the top of your lemon closed. This will be covered with the stem/leaves, so the green stitches will not show and does not need to look perfect.


Tact down the stem of leaves.


Continue sewing around the entire stem, pulling the thread to give a knob shape, like you have on the bottom of your lemon.


Pull the needle up through the center of the stem.


Make a thick French knot. This provides no real purpose other than visual.


Using the same needle and thread, pull the needle back into the French knot and re-emerge the needle down the center of one of the leaves. Embroider up the center of the leaf, attaching it with each stitch to the body of the lemon.


With each new embroidery stitch, pull your thread tight. This will pull the sides of your leaves up, giving it more shape.


Repeat these steps for the remaining leaf.


Now that it's done, I give you my


you'll love these lemons.


If you enjoyed this tutorial, make sure to check out my other felt food tutorials as well.

Thursday, September 29, 2011

The Queen of Quilts

The Queen of Quilts, my mom {a title I have given her}, has done it again.

Not too long ago, my friend's son,


was born. I asked my mom to make, what has become her trademark quilt, a 'name quilt' for him. Graciously, she agreed.

I found the cutest United States fabric, displaying every state and what that state is known for, from Hobby Lobby. This fabric is what inspired and drove the design for the rest of the quilt.


My friend, met and married her husband in Illinois. A few years later, they moved to Indiana where they started their family. Given the meaning these two states have for this family, it seemed fitting they be highlighted within the quilt.


The Queen of Quilts adds a personalized label to the backside of the every quilt she makes. The label she typically adds involves a picture of the parents {or family} along with the sweetest saying:


For this quilt, though, I wanted something different. Since the state fabric was the theme of the quilt, I wrote a saying, I thought summarized the quilt and embraced the sentiment their family has and will live by:


The wonderful thing about these quilts, even though she has made countless, each is unique, thoughtful and personalized. In attempts to personalize them even further, she's even been known to added birth information to a square.


Personally, I think they are the perfect addition to any nursery.


These quilts also make the cutest prop for newborn pictures.


Of all the countless 'name quilts' she has made, I do have a favorite...


You aren't surprised Grace has one, are you?

If you wanted to see more of 'The Queen of Quilts' and her collection, you can pop over to facebook and check them out.

Wednesday, September 28, 2011

Martha Stewart Slip Up

I'd like to think Martha Stewart and I are close personal friends, after all, she does send me emails on a daily basis. Ok, I admit, she never really asks me anything about myself in the emails she mainly only shares tips of the day.


One of the most recent tips, Martha's No-Slip area rugs, sparked my interest.

The key phrase I took out of this helpful organizational tip of the day was no slip. Brilliant.

All my floors are hardwood so slipping rugs are definitely something I am interested in preventing. I currently have rug grippers from Home Depot BUT after having been used for a few years, they are starting to look beat up...not that anyone actually looks at them but me, considering they are under the carpet.


Some of Martha's projects, I know better than to tackle BUT this one seemed easy and I actually had the supplies on hand to try it. The instructions, flip the rug over and apply lines of acrylic-latex caulk every 6 inches or so. When completely dried, turn the rug back over and the rubbery strips will hold it in place.


So confident that it would work, I threw out my rug grippers as I patiently waited for the caulk to dry. When my carpet seemed ready, I proudly flipped over my carpet, happy to be rid of the carpet gripper. I then took my first step onto the carpet and this is what happened...


I took a not so magical carpet ride. I slid across the floor on my 'no-slip' carpet. I'll try not to let this tarnish my friendship with Martha.

Tuesday, September 27, 2011

Not Your Ordinary School Pictures

I was driving by an old school, near our house, that is due for demolition. Having the knowledge that soon this building would be gone, I started to look at it in a new light.


Something about this school, in particular the garage doors, drew me in and compelled me to grab my camera and take some pictures.


23 really doesn't have any particular meaning to our family...


but 3 does {since Grace is currently 3}. With my growing knowledge of Photoshop Elements {the cheaper version of Photoshop, with a few less bells and whistles, but enough for my editing needs}, I was able to remove the 2.


The distressed garage doors resulted in an interesting background. The promise of a lollipop resulted in a willing model.


I even decided to step in front of the camera.


Sometimes an unexpected location may lend itself to some interesting pictures. You never know where your next memorable photo may be taken.

If you think that Grace's hat is adorable, head over to Aesthetic Nest for the free pattern to make one of your own.

Monday, September 26, 2011

Banana Bread

My bananas are fully ripe, which sounds so much nicer than they actually appear, so it's time to make some banana bread!


The tried and true banana bread recipe I use originated from Better Homes and Gardens New Dieter Cookbook.

I recently started to modify this banana bread recipe. I like to add 3/4 a cup of blueberries {I've used 3/4 a cup of dried cranberries instead of blueberries and that is equally as yummy}. I also like to add the juice of half a lemon to provide a brighter flavor.


In the past I had prepared my loaf pan with Pam non stick spray, but now I butter my pan and...


coat it with powdered sugar {I see the irony, since I am using a dieter's recipe and adding things that are obviously not low cal}. When I make brownies or chocolate cake, I butter my pan and coat it with cocoa powder.


Then, in goes my banana bread batter and the waiting begins.


45 minutes later, golden and delicious, my banana bread is ready. For a family of only 3, you'd be surprised how quickly this disappears!


I love when the house smells like banana bread. It's one of the rare June Clever moments I have in life.

Friday, September 23, 2011

I heart fake food - Felt Banana Tutorial


Supplies:
Yellow and Brown felt
Brown thread and needle
Fiberfill
Fabric glue
Pattern
Sewing machine and some embroidery
Optional: Sticker from a real banana

Using the pattern found below or which can be downloaded here.


Begin to cut out your banana.


Arrange the 2 identical curved pieces together.


1/4 of an inch down from the top on the side that curves out, start sewing and continue to the very bottom of that same side.


When you have finished sewing this section, it should look like this.


Line up the third {unique) piece of banana, between the open section of the two sides you just sewed together.


Start by sewing one side of the third piece to one side of the curved pieces. Again, starting 1/4 of an inch down from the top.


Finish by sewing the last remaining side together {closing your banana}. When you all sides have been sewn together, check to see if the the bottom of the banana was securely closed. Mine is not.


If you have the same problem, simply go back and sew across the bottom of all three sections.


Carefully turn your banana right side out.


Generously stuff with fiberfill.


See these raw open edges on the top.


Tuck them into the banana.


Now for the stem. Grab the brown rectangle shaped piece of felt and fold it in half.


Tightly roll the felt up.


Secure the bottom of the rolled up stem with a stitch to maintain the shape.


Grab your banana.


Insert the rolled up stem into the top of the banana. Using your brown thread, secure the stem into the top of the banana.


I like to add an embroidered stitch down the seam of the banana to give it a little bit of dimension. Using the same brown thread, begin to embroider, following the seam line.


Continue down all three sides, covering all three seam lines.


To finish the bottom of your banana,


attach the brown circle of felt with a dab of fabric glue.


Optional: check out your real bananas, steal a sticker off one of them and attach it to your felt banana.


I think Rachel Zoe summarizes this tutorial the best...


Make sure to check out my other felt food tutorials as well.
Related Posts Plugin for WordPress, Blogger...