Friday, March 30, 2012

Bunny Tail Tutorial

Looking for an easy craft even the kids can help with? Why not whip up some bunny tails.


Grab the following supplies:
Cotton balls {I used about 15}
Glue {Elmer's Glue or Tacky Glue}
String


Cut the string long enough to tie around your little one's waist.  Grab those cotton balls and begin to glue.  Glue the cotton balls to each other and then to the center of string.  The hardest part, wait for the glue to dry. 


Bunny tails, the perfect accessory for any Easter egg hunt.


Even Riley participated.


This was just for practice so when my little bunny realized her eggs were empty, I think she was disappointed.


But she certainly looked cute, wearing her bunny tail, collecting those eggs.

Thursday, March 29, 2012

100 Bunnies for Harrisburg

Ann at Suburban Prairie Homemaker has issued a Bonus Craftism Challenge that I am happily and humbly participating in. Ann is trying to gather 100 bunnies to be delivered to a church in Harrisburg, Illinois by Easter.

Harrisburg, Illinois was recently devastated by a tornado. This terrible storm left a path of destruction but it was apparently not devastating enough because FEMA has denied any assistance.

Far too often, I feel compassionate about a cause or a story but wonder, what can I do to make a difference. Well, thanks to Ann, today, I feel like I can do something to make a difference SO I put my posts and projects to the side and I started to make a bunny.


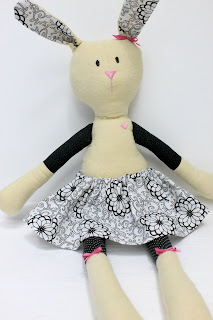
I used Fiona Dalton's Jack Rabbit Sewing Pattern. I always love to add my own personal touch, to anything I do, so this sweet little bunny got some pretty pink bows and a heart {because she was definitely made with a lot of love}.


I can't wait to wrap up my bunny and send her on her way. I am hoping the people in Harrisburg, Illinois will be reminded, they aren't alone.


If you want to join Ann's challenge, you can get the details here.

Linked up and a BIG thanks to:
HookingupwithHoH

Wednesday, March 28, 2012

Bird's Nests

Since I am still waiting for some birds to take the nesting bag bait we put out, I decided to take matters into my own hands and make my own bird's nests.

Thanks to Grateful Belly, that's just what Grace and I did today...in chocolate covered delicious form.


I am self admittedly not a baker, so I appreciate any recipe that calls for only 3 ingredients and requires no baking {other than melting some chocolate}.


Not only are these little bird's nests adorable BUT they are also delicious.


So, I guess while I wait for some real birds to make a nest, I'll happily pass the time enjoying these.

This chocolate fix brought to you by:


If your belly is grumbling, head over there and check out all her tempting recipes.

Tuesday, March 27, 2012

United Scraps of America Part 2

Can you believe it's been over a month since I shared how to start your very own United Scraps of America quilt?


Though I tried to lobby {out of laziness} that the United Scraps of America only needed to represent the continental states, in the end, I knew it wouldn't be complete without Alaska and Hawaii. So I dug through more scraps of fabric and there they are ALL 50 states.


Then, for the past month, I have painstakingly whip stitched each state down.


As I whipped stitched, I changed the thread matching it to each state's unique fabric.


So unless Puerto Rico becomes a state in the next few days, I'd say, I am done {with my part}. The only thing left to do is to hand this off to the Queen of Quilts so she can take my project and transform it into a quilt.


Monday, March 26, 2012

Freezer Stenciling Bunny Shirt


This is a total Old Navy knock off. Thanks for the inspiration Old Navy!

Supplies:
Freezer paper
Iron
Scissors
Fabric Paint
Sponge
Bunny Pattern

Using the pattern {found below}, draw the design out on the matte side of the freezer paper. Cut it out and keep the outline and the inside piece of the ear and eye.


Place the design shiny side facing down on the tee shirt and iron it on {using the cotton setting}.


Grab your fabric paint and sponge and begin to generously dab it on. *Make sure you put a cloth or cardboard inside of your tee shirt to avoid the paint seeping through the layers.


I foolishly used a bright colored shirt and light colored fabric paint. It required numerous coats to completely cover up the pink tee shirt. I recommend using a lighter colored shirt. If you use a light colored tee shirt, it will cover in fewer coats.


When the fabric paint has completely dried, peel up your freezer stencil. Mine turned out cute BUT since it required multiple coats of paint, the bunny is a little on the hard side.


Even though I am fairly certain this shirt could also double as a bullet proof vest, I still think Grace will look cute in it.

*This bunny isn't just for tee shirts...you never know where else he might pop up.


Friday, March 23, 2012

Nesting Bags

Every spring, we find at least one bird's nest in our yard. And every year, baby birds fill our yard as they attempt to learn how to fly.


Maybe since Grace is growing up and I have no one to baby, this year, I am turning my maternal urges to the birds.

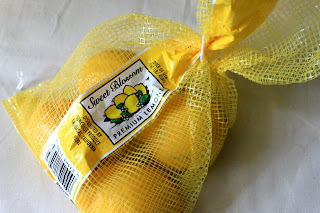
So, I grabbed some lemons. Birds like lemons, right? Seriously, though, I grabbed the lemons for the mesh bag which seemed like a perfect nesting bag for my feathered friends.


Nesting bags can be made of the following: pet hair {which we have ample amounts of}, thread, yarn, felt, batting and dryer lint.

So, I filled my mesh lemon bag {you could use a mesh onion bag as well} and hung it in one of our trees.


Wondering what I did with the lemons? I put them in iced water, poured myself a glass, sat back and waited for some birdies.


I just hope this turns out better than the last bird project I attempted. I had previously made bird seed ornaments and while they were setting up, a squirrel found his way into our screened in deck for a little snack and he couldn't figure out how to get back out.


If this project takes an unexpected turn, I suspect my husband will ban me from befriending birds.

Thursday, March 22, 2012

Tea for Two...and an uninvited guest

My mom, the Queen of Quilts {a title I have given to her}, made Grace the sweetest quilt. The material she used in the chevron design has dainty tea pots and tea cups. It's like this quilt is just screaming to be used for a tea party.


So that's just what we did and it was the perfect accessory to our tea party...


well, that and pearls, of course.


And, then of course, there is the tea set. It was lovingly made for me by my grandma and I've now handed it down to Grace to create her own memories with.


Though, it appears, I am still creating memories with it as well.


We worried the ants might invade our tea party but, instead, it was Riley.


Grace kept saying, this tea party is delightful and I couldn't have agreed more.


This was definitely a moment that memories are made of.

Wednesday, March 21, 2012

DIY Silhouette

Ok, so I have succumb to the silhouette craze. I've been seeing it every where so I figured, why not give it a try.

My muse...


I pulled Riley's picture into my Silhouette program, traced her out and had my Silhouette do the rest of the work for me {you could do this in Photoshop OR print your image out on paper, cut it out and then trace it on black paper}. I decided I liked the look of the reverse silhouette, so I kept her outline.


This was the hardest part. I am a book lover by nature. Though I have succumb to the silhouette craze, I have not fallen into the Kindle or Nook craze. So, when I decided to use a dictionary page for Riley's body, I had to fight through everything in my nature to actually cut a page out of a book.


Any guesses what page I used?


And there it is proudly on display with her first dog collar and Marley and Me {which if you've read any of my previous Riley posts, you'll understand how fitting that is}.


Linked up and a big thanks to:


button
HookingupwithHoH

Tuesday, March 20, 2012

So long Picnik, hello PicMonkey.

I didn't even have time to shed a proper farewell tear to Picnik before I was rescued with PicMonkey. As most of you already know, Picnik will be closing their doors April 19th and most bloggers were sent into a mild panic.

PicMonkey has just opened up their website AND already it is leaving me thinking, Picnik who.

Much like Picnik, PicMonkey offers a wide variety of free photo editing options.
So, here is a mini tutorial, welcoming PicMonkey into my life.

Open up a browser for PicMonkey. You may as well go ahead and save this to your list of favorites because I know you are going to love it even more than picnik.

Pull in a picture or upload it from your computer.


You'll find yourself in the Basic Edits screen.  You have 6 editing options {crop, rotate, exposure, colors, sharpen and resize}.   Each step is easy to navigate allowing you to adjust your photo giving it a little bit of a boost.


Want to add sometime simple like an arrow. Easy...click the thought bubble icon on the left side. Click on an arrow and it will appear on your photo.  You can turn it, move it, enlarge it and or change the color.


Maybe you want to add text.  Click on the P on the left side, type what you want to say, chose the font and, again, you can change the location, color and the size.


Or do something similar with thought bubbles {thought bubble icon} and adding some text {P icon}.


For all my tutorial pictures, I add a header or title bar. PicMonkey allows you to do this as well. Click on the thought bubble icon, select geometric and chose a shape. I use rectangles and simply expand them to fit across the picture.


Then, select P and type in an appropriate header:
And they lived happily ever after...


Then there are the effects {test tube icon}, which are really fun to play with. They offer the basics like turning your picture to black and white or sepia BUT they also offer other interesting effects.

Dark edges effect.


Boost effect.


Lomo effect.


Posterizing effect.


I think the {pic}monkey says it best, whatever your photographic needs: 'Your photos could be awesome...just sayin'. Head on over to PicMonkey and find out for yourself!
Related Posts Plugin for WordPress, Blogger...