Showing posts with label apron. Show all posts

Monday, June 23, 2014

Garden Apron Party Favors

Garden aprons and 2 things you might not know about me.


First, in addition to being a thrift store shopper, we {the husband and I} are flea market groupies.  We go to 2 flea markets a month and have befriended several vendors. 

One vendor, I begrudgingly befriended, after I shunned him for a few months because he ignored my inquiry to buy his Richard Scary Puzzletown characters. 

I begrudgingly befriended him when I noticed his lovely collection of vintage fabrics.  He had yards and yards of fabrics priced to sell.  All the vintage loveliness below, approximately 30 yards of fabric for $12!


My husband, who either knows me too well, or not well enough, suggested that I should turn this vintage floral fabric into gardening aprons for each guest we invited to Grace's garden themed birthday party.


How many guests, did you ask, had we invited to Grace's garden themed party?  14.


Of course, after he made that suggestion, he quickly retracted his suggestion claiming there was no way I would be able to finish 14 aprons.

When challenged, I will do what it takes to prove you wrong.

As soon as we got home from the flea market, I started cutting, ironing and prepping the aprons.


Each apron included pleating detail.  I mean, I can't just make aprons to prove my competency to my darling husband.  This required wowing him. 


One day later, 14 pleated garden aprons were complete.


All 14 aprons were then nestled inside the flower punch box.


Once they were punched free, 14 little girls enjoyed our garden party in their vintage flower aprons.


Tuesday, January 7, 2014

The 30 Minute Apron Tutorial

Does your little one have a play kitchen?  Or, do they like helping you cook or bake?  This (give or take) 30 minute apron will let them look stylish doing either.


You'll need fabric and a sewing machine.

For this child size apron you'll need approximately 44 inches by 12 inches of fabric for the apron skirt.  The tie will require approximately 66 inches by 3 1/2 inches (though, I did elect to make my apron tie long enough for a big beautiful bow to be tied).

Start by folding your fabric for the apron skirt in half, right sides facing each other, or cutting out two sections of your fabric to measure 22 inches by 12 inches when folded together.


Optional:  Add curved edges to the bottom of your apron.  To easily add curves, use the curve of a plate as a template.  Line up along one corner of the apron, using a rotary cutter cut along the curve.  Fold your fabric in half, to cut the same curve on the other side of the apron.


Now it's time to sew!  Sew down one side of your apron (or if you folded your fabric in half - start sewing at the rounded edge, beneath the fold), across the bottom and back up the other side of your apron.  Leave the top of the apron open.

Clip the corners of your apron, if you opted to curve your edges.  If you left your corners square, clip the points of the edges off, close to seam line.


Turn your apron right side out and press.


Optional:  Top stitch down one side of your apron, across the bottom and back up the other side of the apron.  Though not necessary, top stitching gives your apron a finished more tailored look. 

Optional:  Gathering the fabric at the top of the apron.

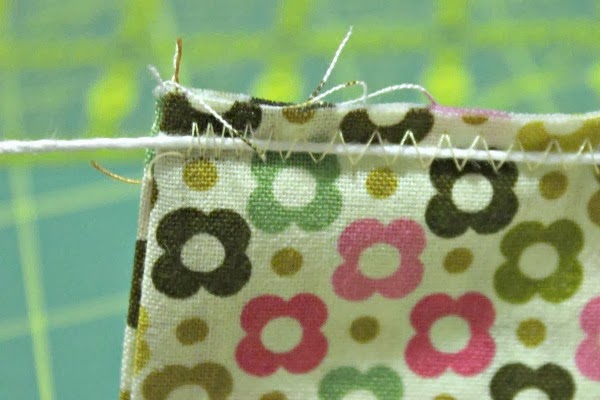
To gather the fabric at the top of the apron, grab some string, long enough that it spans the length of the apron.  Do a zig zag stitch wide enough that it goes over the string.


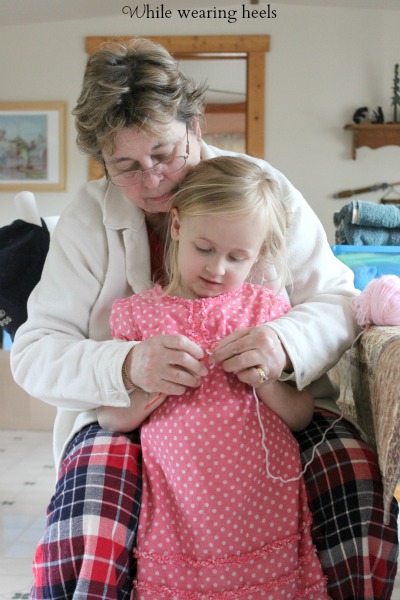
Hold one end of the string in place, while you gently pull the other side of the string, gathering the fabric as you go.


Try and space the gathered fabric evenly so one spot isn't more gathered than another spot.  You should be able to freely adjust the fabric, as long as you hold the string securely.


Time to create the tie.  Want to save a step, use wide ribbon as your tie.

Or you can make your own tie...

Your tie can be made long and wide as you want.  The tie I made is roughly 66 inches by 3 1/2 inches.  To make it long enough, I needed to sew 2 sections of strips together to get the length I wanted.  Press all sides of the tie over roughly a 1/4 of an inch.


Pin your tie to the top of the apron.  Open the 1/4 of an inch seam you pressed, line the outer edge of the tie up with the top of the fabric. 


Sew along the seam line you created from one end of the apron to the other end of the apron.  Take the apron off of the sewing machine.  Fold the tie up, along the 1/4 of an inch you just sewed along, and then fold the rest of the tie, in half over the top of the apron.  Sew the tie into place using a top stitch (basically sew as closely to the bottom of the tie as you can).


Continue top stitching down the length of your tie, across the end of the tie, across the top of the tie, down the opposite side and back to the front of the apron, where you began.


Now go do some imaginary or real baking in style.


First shared with One Artsy Mama.

Wednesday, June 19, 2013

While on vacation..

After Grace's bunny birthday extravaganza, we escaped to Wisconsin.


Although, we didn't stay here.

This sweet little play cabin, which was made by my dad, belongs to Grace and her two cousins.  Daily tea parties were enjoyed here.


Part of what I love about going to Wisconsin is that I have access to the Queen of Quilts, who helps me figure out projects like how to make a child's apron, which I will happily show you how to make (tutorial to follow...eventually).


The Queen of Quilts also taught me the basics of crochet and I began a crocheted baby blanket using a tutorial from Modern Grace.


It must have looked like fun because Grace insisted on crocheting her own blanket.  Of course, her attention span only allowed her to make a tiny scarf for her Barbie.


And, I was able to visit my embroidered USA quilt, which is next on The Queen of Quilts' long arm, waiting to be quilted.


Some other projects from the weekend included, a simple, no sew(!) kite shaped hair bow holder I had pinned from Ruffles and Stuff over a year ago.


I finished another ABC sampler.  Though, to be fair, I only had 7 letters that needed to be completed.  


AND, I finally drew up another Matryoshka doll.  I've only just begun to embroider her, since we return from Wisconsin.


Of course the week was filled with more than just craft projects. 

We took daily boat rides, enjoying feeling the wind in our hair...er, I mean ears.


Proud moments were experienced as I happily watched my sweet little girl catching fish (8 in total), with her grandpa, using hot dogs as bait because she didn't want to hurt any worms.


And, I was reminded, that life truly is made of the little moments.

Related Posts Plugin for WordPress, Blogger...