Showing posts with label art station. Show all posts

Thursday, August 22, 2013

Kitchen Tour AND Big Giveaway

I've joined 24 talented bloggers to show off our kitchens, and not just what makes it pretty but also what makes it work.


 Welcome to my kitchen.  Come on in, take a look around and when you are done, enter a giveaway to win and amazing giveaway.  The best part of this giveaway...there will be 2 winners!  You'll have the chance to win either a Pfister Faucet worth up to $300 OR a $250 Visa gift card.

 
I like to keep things inspirational (be happy just because) and encouraging (EAT!) in my kitchen.


We built a small island in our kitchen, one that houses a wine refrigerator.  This island holds my recipes, gives my daughter a place to sit and snack or craft.


BUT, the custom greenhouse window is one of the major focal points of our kitchen.


If I had more of a green thumb, the greenhouse window would be the perfect place to grow fresh herbs.  Though I have tried to coax basil into living on one of these shelves, I've never succeeded.


So, my greenhouse shelves are filled with succulents, trinkets and inspiration.


Another custom feature we added to our kitchen was a DIY custom knife drawer.  My knives now stay safely in place and organized.


I do a lot of cooking in my house, though I rarely share recipes on my blog.  I like to use the recipes of other talented bloggers, friends and family.  When I cook, I like to grab some fun cooking accessories to make the process more inspiring and fun.


The flower frog is the perfect, unconventional holder for my recipes and the milk bottle Anthropologie measuring cups make me feel as if I am a better cook.


Between cooking meals, I like to have fresh fruit out and accessable.


Since I have a small kitchen, to maximize space, I use command hooks inside of my cabinets to hang oven mitts, towels, aprons and, at one point, bibs hung here as well.


My bib wearer, though, is now a sweet little 5 year old SO my kitchen is also a kid friendly and kid inspired place.

A kid inspired nook of my kitchen is next to my stove.


There you will find my recipe box.  Inside my recipe box, not recipes like you might expect but note cards filled with moments I want to remember spending with Grace.  In this nook, there is also a hand painted trivet covered with Grace's finger prints.  


The kid friendly areas of my kitchen would include the bottom shelf of the refrigerator.  I have it filled with easy to grab kid friendly snacks (with the exception of the tomatoes, I can't get her to eat a tomato for the life of me).


Another kid friendly area of my kitchen, a drawing station on the edge of my cabinet.


 She can stay close, while I am busy in the kitchen yet still have a space of her own. 


The chalk board isn't just for the little one, I've also added it to my canisters as well.


And, those canisters are in my favorite part of my kitchen, the walk in butler's pantry.


Thank you so much for stopping by and...

Don't miss the rest of the kitchen tours this week!

Thursday, August 22
Friday, August 23

And now for the giveaway!

Kitchen Tour Giveaway!

Pfister generously donated a faucet for this giveaway, and the winner of the faucet will also receive a $250 Visa gift card! To enter for your chance to win, just follow the steps below, and good luck! Step 1: Follow the bloggers below on Pinterest
 
Practically Functional

Step 2: Enter the giveaway using the Rafflecopter widget below! a Rafflecopter giveaway

Monday, May 21, 2012

Arts and Crafts Birthday Party - repost

In honor of Grace's 4th birthday, I had to share her 3rd birthday party again. 

Color, paint and play as we celebrate Grace's 3rd birthday. Arts and crafts was the theme of the party from start to finish. If you are interested in the details, keep reading...

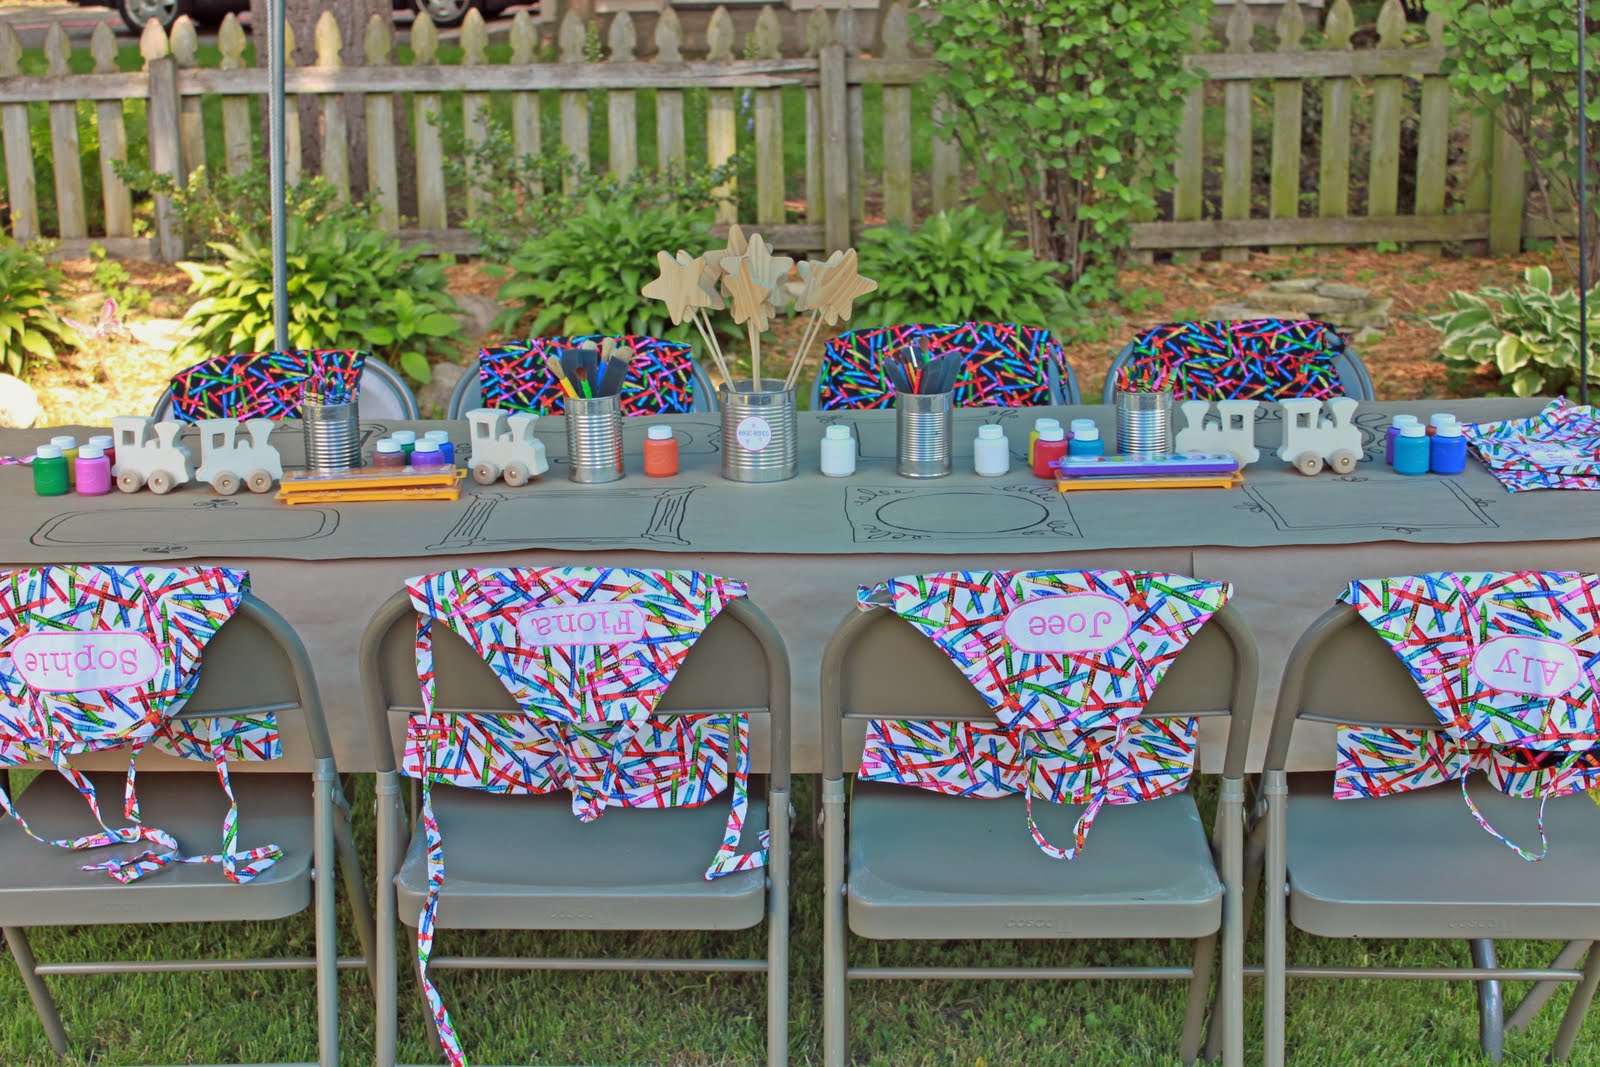
Since the party was a crafting themed party, I focused mainly on our crafting center.


To cover the table, I used 2 rolls of packaging paper, from the dollar store. At each seat, I attempted to draw a frame.


Instead of recycling my cans, for a month, I kept them figuring they would make perfect containers for crayons and paint brushes. The table had an assortment of washable (these are 3 and 4 year olds after all) paint, water colors and crayons.

 
At Hobby Lobby I was able to find wooden wands for $1 that the girls painted and $2 wooden trains, with wheels that actually moved, for the boys to paint.


Every artist needs a gallery. I found a simple and AMAZING tutorial here that walks you through the process of converting pictures into coloring book pages. I made one for each artist but definitely had a favorite or two. Thanks Photojojo for walking me through the process!


Party favors are my favorite part of any party. I had so much fun figuring out what our little crafters would take home with them. Fortunately, crafting runs in the family, my mom made all the personalized aprons out of the most adorable crayon material.


I spelled each guest's name out of crayons, you can see the tutorial here, and used that as not only a party favor but their gift tag. I also sent them home with 2 extra copies of their coloring book page.


Having focused so much time and energy on the crafting table, our decorations were kept simple (if you read between the lines this translates into 'I ran out of time'). 3s, balloons and tissue paper poms decorated the house and outside, though, it was so hot that by the time the party started most of our balloons popped. We also left out a jar for people to leave birthday wishes for the birthday girl. I love anything that has an element of memory keeping, which is probably why I have over 5,000 pictures of Grace and she's only 3.


Yes, we had one of those parties with a photo booth area.


The frame was suspended using heavy gaged fishing line. Eyelet hooks were added to the ceiling of our porch and back of the picture frame. The fishing line was strung between both the hooks on the ceiling and the hooks in the frame. It did take time to get the frame level and hung straight. If you don't have the time to hang a frame, we also took some pictures holding the picture frame.


Hung or held, the pictures taken using the frame were among my favorites. I can see why this is such a popular trend right now.


The theme of the party started with the painter's palette invitations.


Continuing that theme and inspired by the painter's palette cupcake tray I saw here. Using a jig saw and a piece of scrap wood, we were able to create our own version.


 For the cupcakes, I started with white store bought icing and added a few drops of food coloring to mimic different shades of paint.


All in all, I would say the party was a success. Memories were made. Great pictures were taken. Most importantly, the kids all had fun.


Wait until you see what we've come up with for her 4th!  
Related Posts Plugin for WordPress, Blogger...