Showing posts with label letters. Show all posts

Thursday, August 8, 2013

Dear Daddy; A Letter

You've got mail!

This summer, in preparation for kindergarten (which starts in exactly 2 week, I realize while holding back tears), Grace has been practicing letter recognition and penmanship by writing letters.

Grace decides who she wants to write to and what she wants to say, while I dictate the spelling.


In this case, she decided she wanted to write to Riley. 


We don't discriminate when it comes to letter writing.  Even if, when we delivered the letter to Riley, she looked at us as if to ask, 'who me?'.

It's been interesting to see how her penmanship has evolved throughout the summer and how her personality comes across in what she wants to say and how she signs her name. 


Some days we struggle with who we should write to but when something like this arrives in the mail...


Grace has no doubts who she'll write to and what she needs to say.


 Seriously, how could he resist?

Thursday, June 27, 2013

Goodwill Hunting Roundup

It's been awhile but it's back.  So, without further ado, here are my most recent Goodwill finds.

I am a sucker for vintage handbags.  Ok, to be honest, this handbag isn't vintage but it certainly has that charm and character I am drawn too. 


So for $1.49, it's being added to my collection. 


I bought another flower frog.  It was .49 cents.  Perhaps the person pricing inventory coming in had no idea what it was.  I see flower frogs at the flea market all the time and they range from $5 to $10.


But my heart belongs to the metal flower frogs, like this one I did buy from the flea market.  The metal ones are perfect for displaying recipes or cards.


Letters (or numbers) also catch my eye.  I bought the two below for $1 (it was half off yellow ticket day).  Perhaps they were marked down because the G was backwards (just kidding!  checking to see if you are skimming or reading).


And lastly, I buckled and bought Grace this sweet and simple dollhouse for $2.99.


Why do I feel slightly guilty about this?  Well, we did just make a custom dollhouse for her 4th birthday, last year.


One that has an exact replica of the nursery we brought her home to.


But still, the Goodwill dollhouse was only $2.99.

Sigh.

What thrift store finds have you indulged in recently?

***You have probably heard that Google reader is going away July 1st, so if you have been following While Wearing Heels that way, now is the time to switch.  I would love to have you subscribe via email, or you can click the Bloglovin' box on my sidebar.  Bloglovin' is also a reader, it's the one I use to read blogs too.***  

Linked up to:

Thursday, September 22, 2011

Freezer Stenciling Tutorial

Three more pillows done. Cream pillows with brown trim {again, I used the concept from the pillow and piping tutorial, this time, I used a back pocket so that the pillows could be removed from the case}. I love them but lets be honest, they are way too plain.


These, however, make quite a statement.


Can you believe, those pillows were transformed using fabric paint and freezer paper? Interested in learning how, keep reading.

Supplies:
Freezer paper
Fabric paint (I bought mine at Joann's for under $2 a bottle, there are a wide variety of colors)
Sponge (there are specific sponges you can buy but I like to save money so I used a sponge I already had, cutting a section off to make it easier to use)
Fabric you want to paint along with a smaller test piece of fabric
Scissors and or X-acto knife
An Iron
A Design (you can print anything and use that for your pattern)

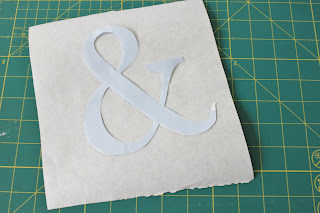
Decide on your design, I printed out an ampersand {font: Baskerville Old size: 600}. Cut your design out of paper and use it as a pattern. Trace your design onto freezer paper. Trace on the paper side, not the shiny side.


Now that the design is drawn out on freezer paper, begin to cut it out. The first time I tried using freezer paper, I didn't realize what I needed to keep, for me, it was the opposite of what I initially thought. You'll want to get rid of the design and keep the white space around it or in it. So, it doesn't matter how you cut the design out BUT it does matter how you cut the lines where your design meets the white space.


Here is what my design looks like cut out.


Grab your fabric, in this case, I used a pillowcase {remove your pillow, before painting}. Fold the pillowcase or fabric in half, pressing down to create a crease, to determine the middle.


Using your crease as a guide, determine placement of your design. Make sure to place the shiny side of the design down and the paper side up.


Using an iron, set to cotton (depending on your fabric, you may need to select another setting), I ironed my design onto the fabric. I started by only ironing down the outside of the design.


Using my paper pattern as a guide, I determine placement of the inside pieces of my freezer paper.


Next iron those pieces onto the fabric {remove your paper design before you iron down the freezer paper}.


Grab your sponge, paint and a piece of cardboard to squirt some of the fabric paint onto. If you have a test piece of fabric, test how the paint will adhere before continuing. Before you begin, you may want to put a towel behind your fabric, in case the paint seeps through.


Dab your sponge into the paint, you don't want a lot of excess paint on your sponge. Start dabbing the paint onto the fabric exposed through your design, work from the edge of the freezer paper into the design. By dabbing into the design, this should help you keep your edges crisper. If you work from the inside of your design out, you may run the risk of pushing some of excess paint under or into the edge of your freezer paper design.


Continue dabbing your paint on all fabric exposed from your design.


When the fabric paint has completely dried, slowly start to peel up the freezer paper.


what you are left with is your design...


& I love it.


I loved it so much, I made 2 more. I used the same concept as described above. In steps, I painted a large circle {I used a large serving platter as a template to trace onto the freezer paper}. When the outer circle was dried, I painted the smaller circle {I used a smaller serving platter as the template}. Finally, I painted the letters in the middle.


I am not sure I'll ever use freezer paper for its intended purpose again.


The only problem, this is Riley's sofa. I worry that most of the time, my pillows will end up looking like this...

Wednesday, August 17, 2011

My love affair with letters continues

This isn't my first post about letters and I am sure it will not be my last either. Monograms, letters and initials, in any form, will always catch my eye.

It came as no surprise to my husband when I stopped to look at some alphabet tiles, while walking through a flea market (I should mention, this won't be the last post about flea markets either). I held my breath as I looked through the stack, hoping I would find a g. Just as panic started to set in, there it was, a bright and cheery g. It reminded me of Sesame Street and sunny days. I had to have it. I don't have a good poker face when it comes to things I want, which is what makes me so terrible at negotiating the price with sellers, so when I was told it was only a dollar, it seemed too good to be true. The deal was sealed and the g was mine (well, Grace's).


When I returned home, g in hand, the task of figuring out where to put it began. I guess love of reading naturally comes hand in hand with the love of all things letter related. So, when I saw The Giving Tree, by Shel Silverstein, which is the same color as the g I just bought, inspiration struck. I began rearranging Grace's shelves deciding to highlight some of Grace's favorite books and in turn providing a focal point for her new g.


The g looks so perfect against the simply designed, bright green cover of The Giving Tree. Just looking at that shelf brings a smile to my face.


I've decided, I am definitely going to start a collection of Gs for Grace.

Not even a week later, I was at a local thrift store and found a set of alphabet tiles, a whole set, for a dollar. Even though I wasn't sure what I would do with them, I couldn't walk away. So now $2 later, I have 27 letters (including Grace's g).


Is this an obsession OR is it just...


Related Posts Plugin for WordPress, Blogger...