Showing posts with label quick Valentine's day projects. Show all posts
Monday, February 4, 2013
*Punny* Finger Painted Silhouette Valentines
No matter how old your little one is, this is the perfect option for a personalized, meaningful Valentine's day card, thank you card or just because card.
What you'll need:
Finger paints
Card stock {white to paint on and colored to create your card out of}
Silhouette shapes {we did a Google image search for animal shapes}
Scissors
Glue
Stamps, markers or pen {to write your card out}
And a willing artist...
When the finger painting masterpiece, your little artist created, has completely dried, trace out a few silhouette shapes of animals {or whatever shape you decide}.
Either you or your little artist {depending on how skilled they are with scissors} can cut the finger painting shapes out.
Using either stamps, markers or a pen add a caption to your card. I am a fan of adding some sort of a pun to my cards. As if ewe hadn't already guessed.
I guarantee, anyone that receives one of these cards will think they are purr-fect.
This is such an easy way to involve your little one {regardless of age} so they can create something truly unforgettable.
What a sweet way to let some bunny, any bunny know how much you care.
I hope you and your little artist have fun making some of your own cards and creating some memories in the process.
Wednesday, January 30, 2013
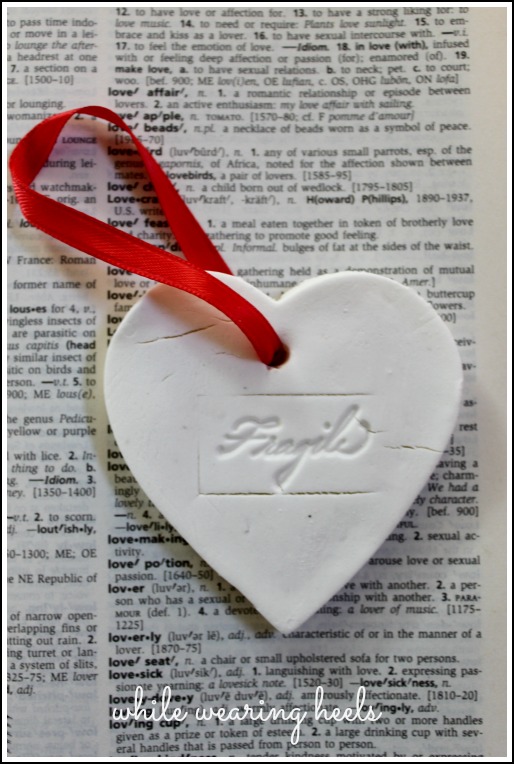
Fragile Hearts Made of Clay
A clay dough recipe for the fragile hearted.
The recipe, a cup of baking soda, 3/4 cup of water, 1/2 cup of corn starch. Mix the ingredients in a sauce pan, over medium low heat, stirring until it's the consistency of mashed potatoes. *For a more detailed tutorial, go check out The Woodside Kitchen.
When the dough has cooled, roll them out and have fun creating different shapes using cookie cutters.
Then, get creative making some imprints with rubber stamps.
Fragile hearts seemed poetic.
Bake the ornaments for roughly 1 hour at 175 degrees. Once cooled, hang and decorate.
A wonderful reminder that the heart and love are both fragile and to be handled with care.
Though I love my fragile heart, to take a page from Mellywood's Mansion, I desperately wanted this to be a delight BUT the more my ornaments dried out, the more *fragile* they started to look. Of the 13 ornaments I made, only 1 was worth saving. All were cracked and some cracks even went clear through to the back of the ornament.
Help me turn this disaster into a delight...where did I go wrong?
The recipe, a cup of baking soda, 3/4 cup of water, 1/2 cup of corn starch. Mix the ingredients in a sauce pan, over medium low heat, stirring until it's the consistency of mashed potatoes. *For a more detailed tutorial, go check out The Woodside Kitchen.
When the dough has cooled, roll them out and have fun creating different shapes using cookie cutters.
Then, get creative making some imprints with rubber stamps.
Fragile hearts seemed poetic.
Bake the ornaments for roughly 1 hour at 175 degrees. Once cooled, hang and decorate.
A wonderful reminder that the heart and love are both fragile and to be handled with care.
Though I love my fragile heart, to take a page from Mellywood's Mansion, I desperately wanted this to be a delight BUT the more my ornaments dried out, the more *fragile* they started to look. Of the 13 ornaments I made, only 1 was worth saving. All were cracked and some cracks even went clear through to the back of the ornament.
Help me turn this disaster into a delight...where did I go wrong?
Thursday, January 24, 2013
LOVED Tee Shirt
With a plain red tee shirt on hand and Valentine's day rapidly approaching, I decided to make Grace a LOVED shirt.
To make your own LOVED tee shirt, get yourself:
a tee shirt
embroidery thread or use 2 strands of DMC thread {I used DMC white}
needle
embroidery hoop
water erasable fabric marking pen
On paper, I wrote out LOVED to figure out the spacing. Then, I folded the tee shirt and determined roughly where the center was and where I would place the lettering. I free handed and drew LOVED onto the tee shirt with a water solvable pen.
The nice thing with the water solvable pen, any perfectionist tendencies you have, if at first you aren't happy, apply some water {let it dry} and then try again.
Embroider the letters using a stain stitch. This basically means, work each stitch smoothly from one side of the letter to the other side of the letter. Lay each stitch as close together as possible (without pulling too tightly). The goal is that no fabric will show through between each satin stitch.
When you are done, use some water to dissolve any exposed lines. And admire!
Yes, Grace is definitely LOVED...
even when she gives me that sassy look.
I hope you've been inspired and feel loved.
To make your own LOVED tee shirt, get yourself:
a tee shirt
embroidery thread or use 2 strands of DMC thread {I used DMC white}
needle
embroidery hoop
water erasable fabric marking pen
On paper, I wrote out LOVED to figure out the spacing. Then, I folded the tee shirt and determined roughly where the center was and where I would place the lettering. I free handed and drew LOVED onto the tee shirt with a water solvable pen.
The nice thing with the water solvable pen, any perfectionist tendencies you have, if at first you aren't happy, apply some water {let it dry} and then try again.
Embroider the letters using a stain stitch. This basically means, work each stitch smoothly from one side of the letter to the other side of the letter. Lay each stitch as close together as possible (without pulling too tightly). The goal is that no fabric will show through between each satin stitch.
When you are done, use some water to dissolve any exposed lines. And admire!
Yes, Grace is definitely LOVED...
even when she gives me that sassy look.
I hope you've been inspired and feel loved.
Tuesday, January 15, 2013
Valentine's day 2012
I am, and continue to be, suffering from crafter's block. Yes, writer's block for those who craft. Sigh. I am sure inspiration will strike soon BUT for now, I'll share some of my Valentine's inspired creations from last year.
Finger paint animal silhouette Valentine's along with some puns.
Hand print Valentine's.
Eraser to stamp tutorial.
5 minute Valentine's day decor, you are guaranteed to love.
Embroidered 'loved' tee shirt.
Doggie Bag Tutorial. Perfect bag to collect all those Valentine's day cards in.
Heart shaped bird seed ornaments.
Heart shaped, stamped, clay ornaments.
Dino-mite Valentine Day Cards.
'Love is all you need, all you need is love' garland.
Though I am creatively uninspired at the moment, I hope this look back on Valentine's day 2012 makes you feel inspired.
Finger paint animal silhouette Valentine's along with some puns.
Hand print Valentine's.
Eraser to stamp tutorial.
Embroidered 'loved' tee shirt.
Doggie Bag Tutorial. Perfect bag to collect all those Valentine's day cards in.
Heart shaped bird seed ornaments.
Heart shaped, stamped, clay ornaments.
Dino-mite Valentine Day Cards.
'Love is all you need, all you need is love' garland.
Though I am creatively uninspired at the moment, I hope this look back on Valentine's day 2012 makes you feel inspired.
Tuesday, February 7, 2012
5 Minute Valentine DIY Decor You'll Love
I am, and for as long as I can remember have been, a big fan of hearts. I wanted to come up with a simple to execute, bold and graphic decoration for Valentine's day using a heart.
What you will need:
A frame
Contact paper or card stock
scissors
Chalk
Using some chalk board contact paper, cut out a heart.
If you don't have any chalk board paper you can use some black card stock. Don't believe me...
Write something sweet on your heart and put it in a frame {I mounted my heart on white card stock instead of matting material}.
Then, decide where you want to show it off.
Who knows, my love frame might be sticking around even after Valentine's day.
What you will need:
A frame
Contact paper or card stock
scissors
Chalk
Using some chalk board contact paper, cut out a heart.
If you don't have any chalk board paper you can use some black card stock. Don't believe me...
Write something sweet on your heart and put it in a frame {I mounted my heart on white card stock instead of matting material}.
Then, decide where you want to show it off.
Who knows, my love frame might be sticking around even after Valentine's day.
Subscribe to:
Posts (Atom)