


And perhaps more personal.

Gather the following supplies, to make your own glass vase cover: glass floral vase, scrap fabric (roughly 4 inches wide by 12 inches long), washcloth, *reusable freezer paper and a printer.

*To make reusable freezer paper: using spray adhesive, spray the paper side (NOT the shiny side) of freezer paper and adhere it to a sheet of copy paper. Trim off any excess freezer paper, leaving the finish size the same size as copy paper (8 1/2 by 11).
Select an image or graphic. The Graphic Fairy is a great source to find free graphics, which is where I found the image I used.
Print your image, running the copy paper through your printer, shiny side of the freezer paper facing the ink cartridge. *If you are using an image with words, make sure you transpose or flip your image prior to printing.

If you skip this step, your image, once transferred will look something like this...

With a barely wet washcloth, dampen the area of the fabric you want to transfer your image onto. Flip your freezer paper over, centering your imagine onto the dampened fabric. Press firmly into the image, using either the back of your thumb or the back of a spoon, transferring the image onto the fabric.

And, just like that, you have successfully transferred an image onto fabric. Use a hot iron to heat set the ink.

You can finish your ends by attaching no-sew Velcro, gluing it or using some double sided tape to secure it closed. It all depends on how ambitious you are feeling.
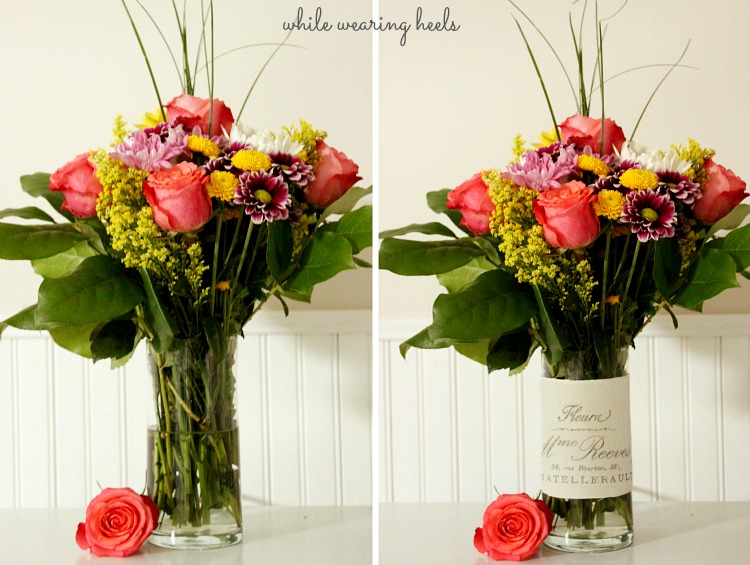
Find a naked glass vase and dress it up. It really does make any bouquet of flowers even more beautiful, doesn't it?
The best part of transferring images using freezer paper...you can just whip it clean and reuse it.

For similar projects check out my lavender sachet, made using the same technique described above OR another easy glass vase upgrade.

Originally shared at 'Or so she says...'

girl!! how awesome is this?! seriously this is so cute! you could make covers for all the holidays, the awesome one with their name, put inside the vase wrap a bow around it and viola an amazing gift that is useful! definitely an etsy collection!
ReplyDeleteI get my transfer methods mixed up. Really, I have to read each process each time like it's the first time I have done it. I have a fear of transfer mess up.
ReplyDeleteBliss
So, so beautiful Amy! Just adds such a romantic feel to the flowers :)
ReplyDeleteI love this! I purposely grow flowers each year to be able to cut and give away. This would be perfect to add a personal touch. Thanks for sharing.
ReplyDeleteSo beautiful! I have never tried this technique, but I plan to because it looks so easy. Thank you for giving me a pretty, new-sew project Amy! Pinning!
ReplyDeleteThis is sooo pretty Amy! It really adds a special touch to a plain glass vase. I've been wanting to try a transfer for a while now, but didn't really understand how to go about it. Thanks so much for this great tutorial. I think I could do this!
ReplyDeleteWhat a huge difference that makes. I usually look for colored vases because I don't like the look of all those stems, but this is SO much better!
ReplyDeleteThank you so much Erin. It's a quick and fun project and really is SO easy.
Deleteohhhhh, I am going to steal this technique!!! Love it!
ReplyDeleteI just bought freezer paper! I might have to try this :)
ReplyDeleteThanks Amy. If you could make a pencil skirt to perfection, you could easily tackle this :)
ReplyDeleteOoh, never tried this! The results look beautiful, might have to give it a go!
ReplyDeleteEstelle xx
Oh my...I LOVE IT!! Would love to have you come share it at my NIFTY THRIFTY TUESDAY party...hope to see ya there:)
ReplyDeleteBlessings,
Linda
LOVE this idea!! I have never done an image transfer using freezer paper but you make it look so easy. Already starting to brainstorm more ideas on how I can use this. It's amazing how something so simple can really dress up a bouquet of flowers.
ReplyDeleteThat's gorgeous! It really takes the arrangement to a new level... <3 it!
ReplyDeleteThank you so much Heather. You leave the sweetest most generous comments.
DeleteThat is soooo cool! I don't think that freezer paper is readily available in Canada. I'm going to have to pick some up the next time I'm in the US!
ReplyDeleteI need to try out freezer paper. Your projects are always so creative and turn out beautiful...and this is no exception.
ReplyDeleteCute idea! And the flowers are gorgeous!
ReplyDeleteI love this Amy!! It turned out gorgeous! Printing on fabric is so awesome, and I had no idea that you could do this transfer method!
ReplyDeleteThanks so much Lisa. This is a really easy practically no fail method of transferring an image.
DeleteSo you print on the shiny side of the freezer paper? The ink won't rub off while printing? And then the wet paper helps to transfer that ink onto the fabric? Interesting. Love that it's reusable. And it also produces a light/vintage transfer. Is wax paper the same as freezer paper? Sorry for all the questions!
ReplyDeleteThat so cute! I definitely need to try this technique!
ReplyDeleteWow! It's amazing what a difference a little paper can make! Love it :) Thanks for linking up to Monday Funday!
ReplyDeleteThat's awesome! I never knew your could do transfers with freezer paper onto fabric like that! I have so many ideas now for that little trick. Thank you very much for the inspiration!
ReplyDeleteKristy @ 3Peppers-Recipes.com
Amy - is it okay if I feature this in a hostess gift round-up? Whaddya say? ;)
ReplyDeleteBeautiful and what a good idea, never thought of doing it like this, thank you thank you for the tip! (I came straight
ReplyDeleteBuy glass Vases Online at Low Prices in India
Wonderful blog!!! I liked the complete article…. great written,Thanks for all the information you have provided…glass vases for sale
ReplyDeleteWow! what a nice idea glass flower vase cover, i need to try this technique!it is quick and easy bouquet of flowers, i want to doing it. Thank you for sharing this tip. keep it up.
ReplyDeletehttp://www.inflowcomm.com3/shoretel-tech-support/shoretel-tech-support-chicago-il/